Echo Global's Updated Conversation Filtering System

About
Filters are a set of triggers, rules, and actions to help correctly route your client messages to the group of users you want for response. In descending order, each filter is evaluated for matching criteria. You can easily drag and drop filters into the order you like (except for the catch-all, it’s always last). If you’ve used Echo’s current conversation filtering system, you will know it provides a series of options (rules) you can set that will tell Echo which permission set bucket you want conversations to filter into (plus some newly added actions). Echo’s updated filtering system provides the same options as before, but includes a series of addition settings (triggers and actions) designed to help you interact even more quickly and efficiently to incoming conversations.
This guide will walk you through every aspect of our updated filters, explaining not just how to use them, but why they work the way they do. Whether you're new to Echo Global or have been using our previous filtering system, this guide will help you understand and make the most of these powerful new features.
Finding Your Way to Filters
We've made it easier to find filters in the Echo. Here's how to get started:
1. First, log into your Echo Global admin panel
2. Look at the left side of your screen - you'll see a sidebar with various options
3. Find and click on "Filter Collections" in this sidebar
We've added this direct access point because we know how frustrating it was to hunt through multiple menus in the past. This simple change means you can get to your filters with just one click.
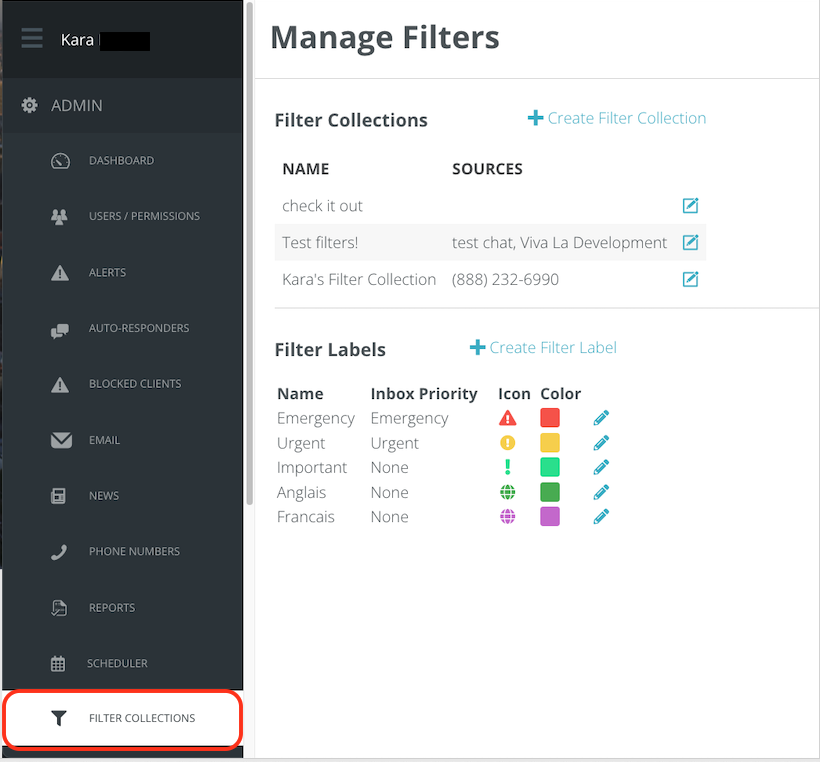
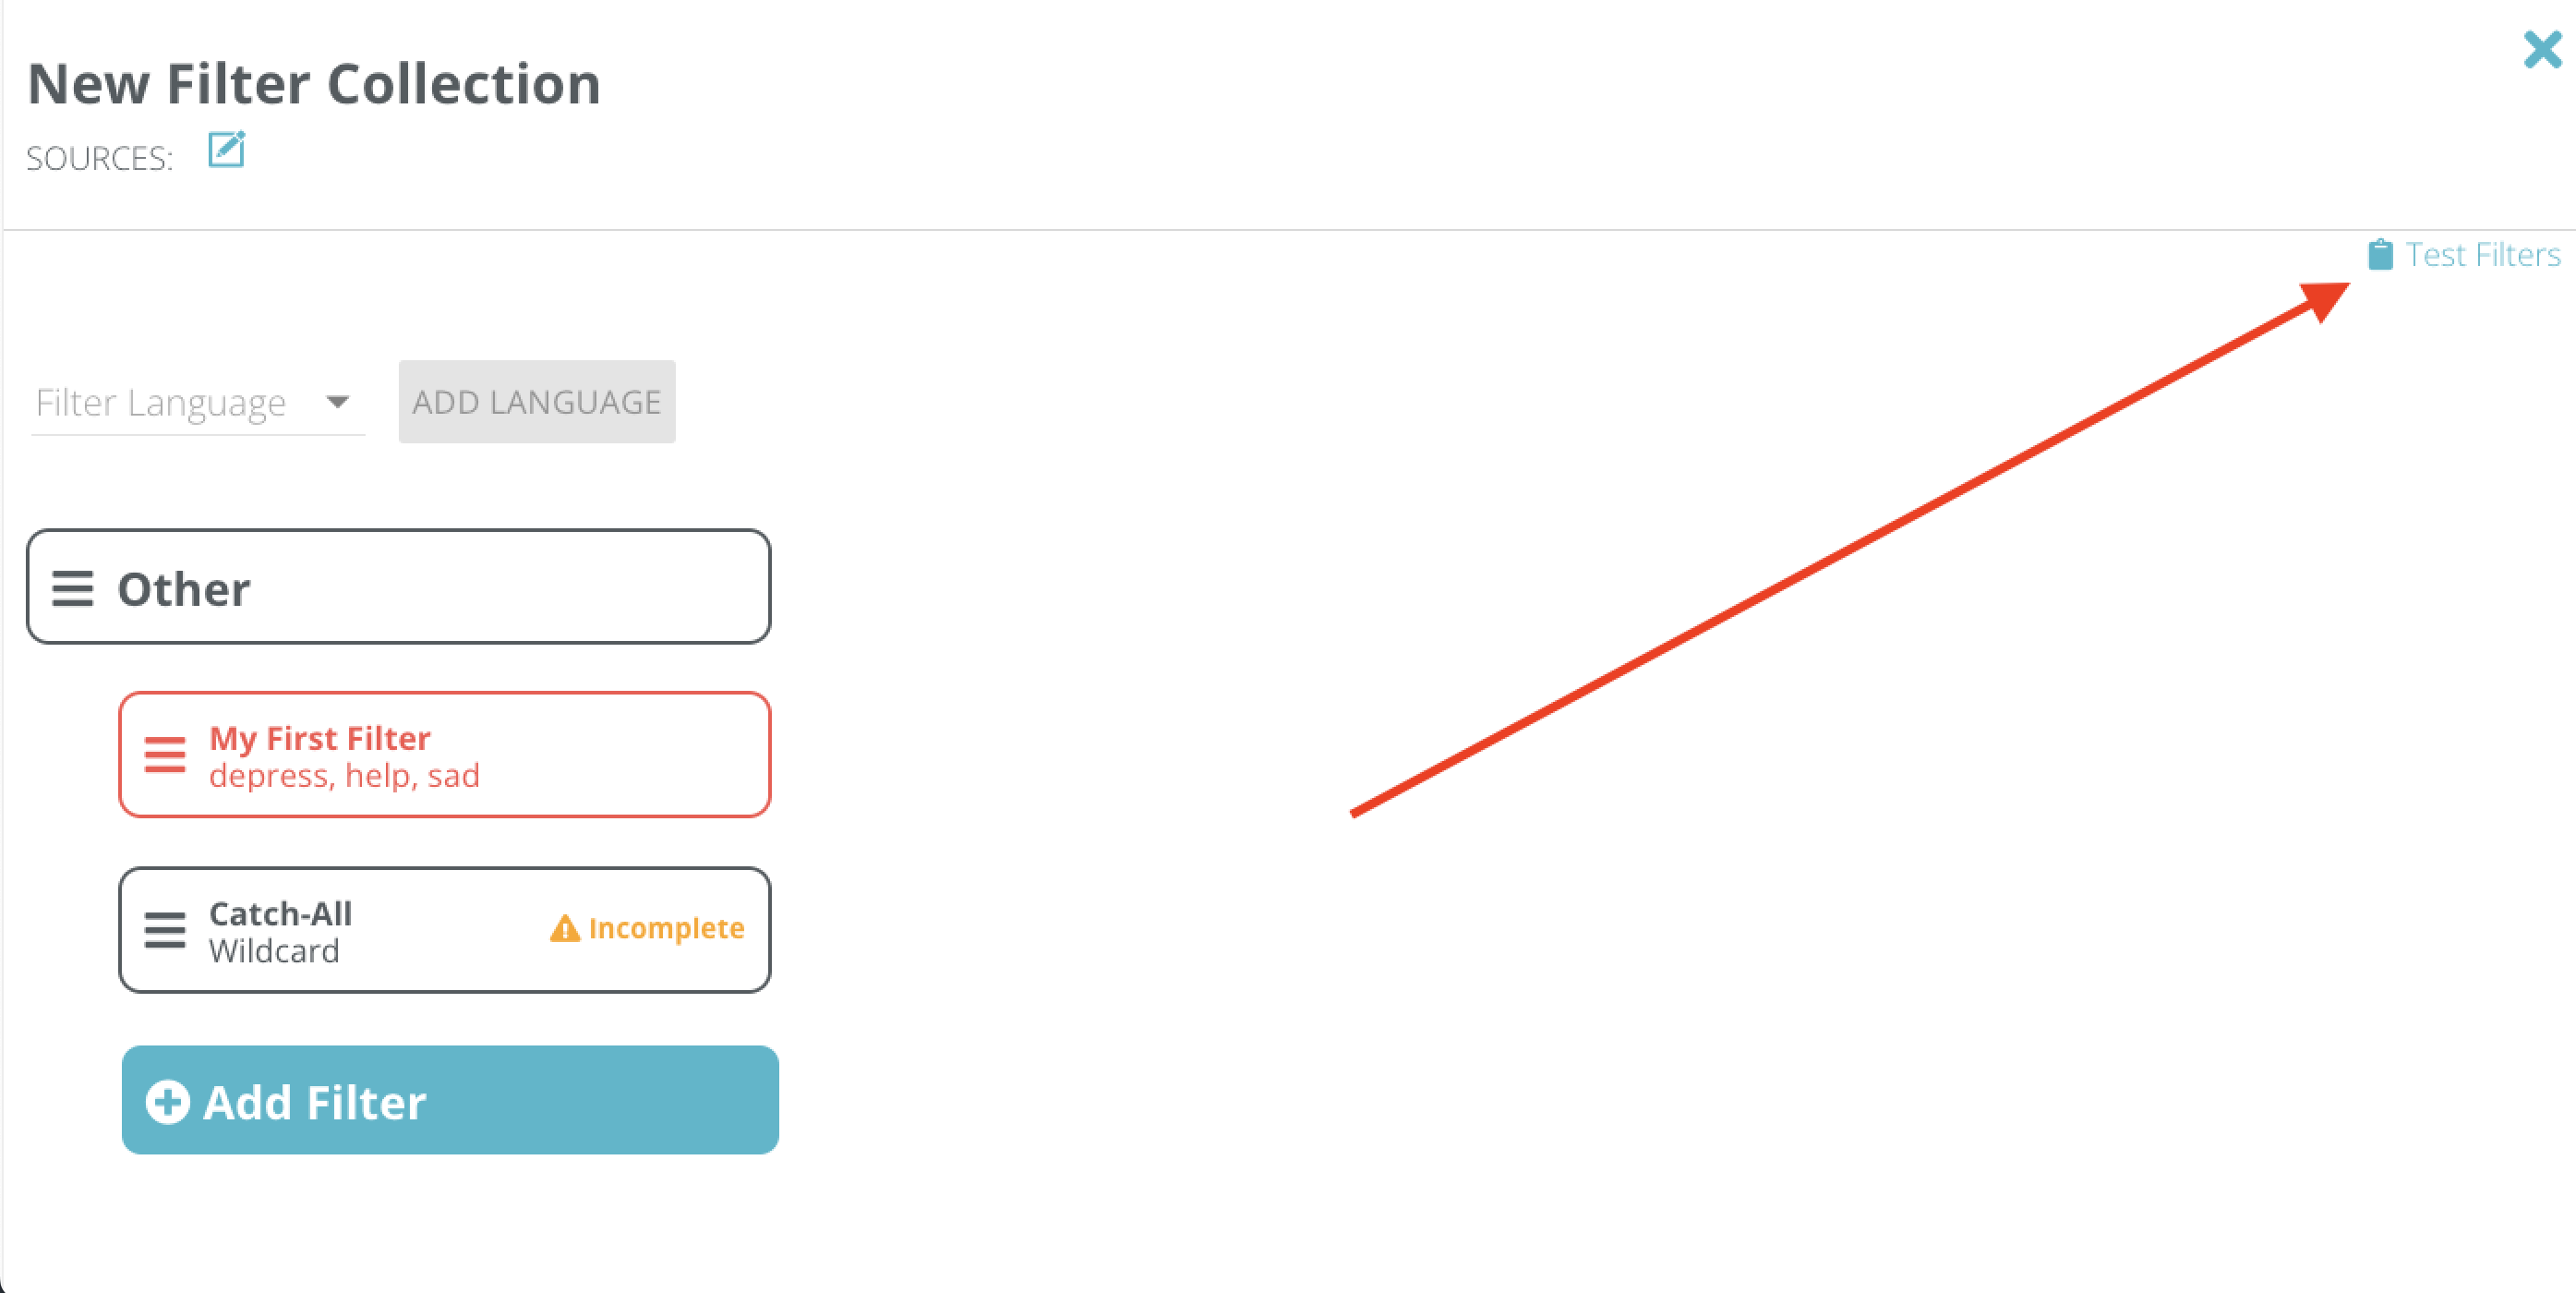
Here you are able to view and edit any existing filter collections by clicking the square edit icon, or add a new filter collection by clicking on +Create New Collection.
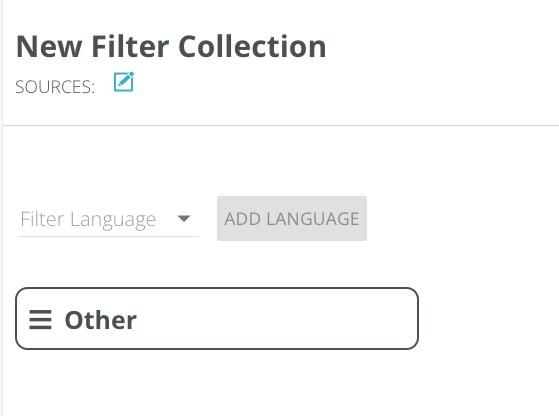
Before you do any of the below steps, first determine which of your sources you want included in this filter collection, and add any languages you want this filter collection to try and detect. *If you don't add any languages, Echo will use the "Other" Filter, and move on to the other filter triggers, rules, and actions you have applied to that filter.
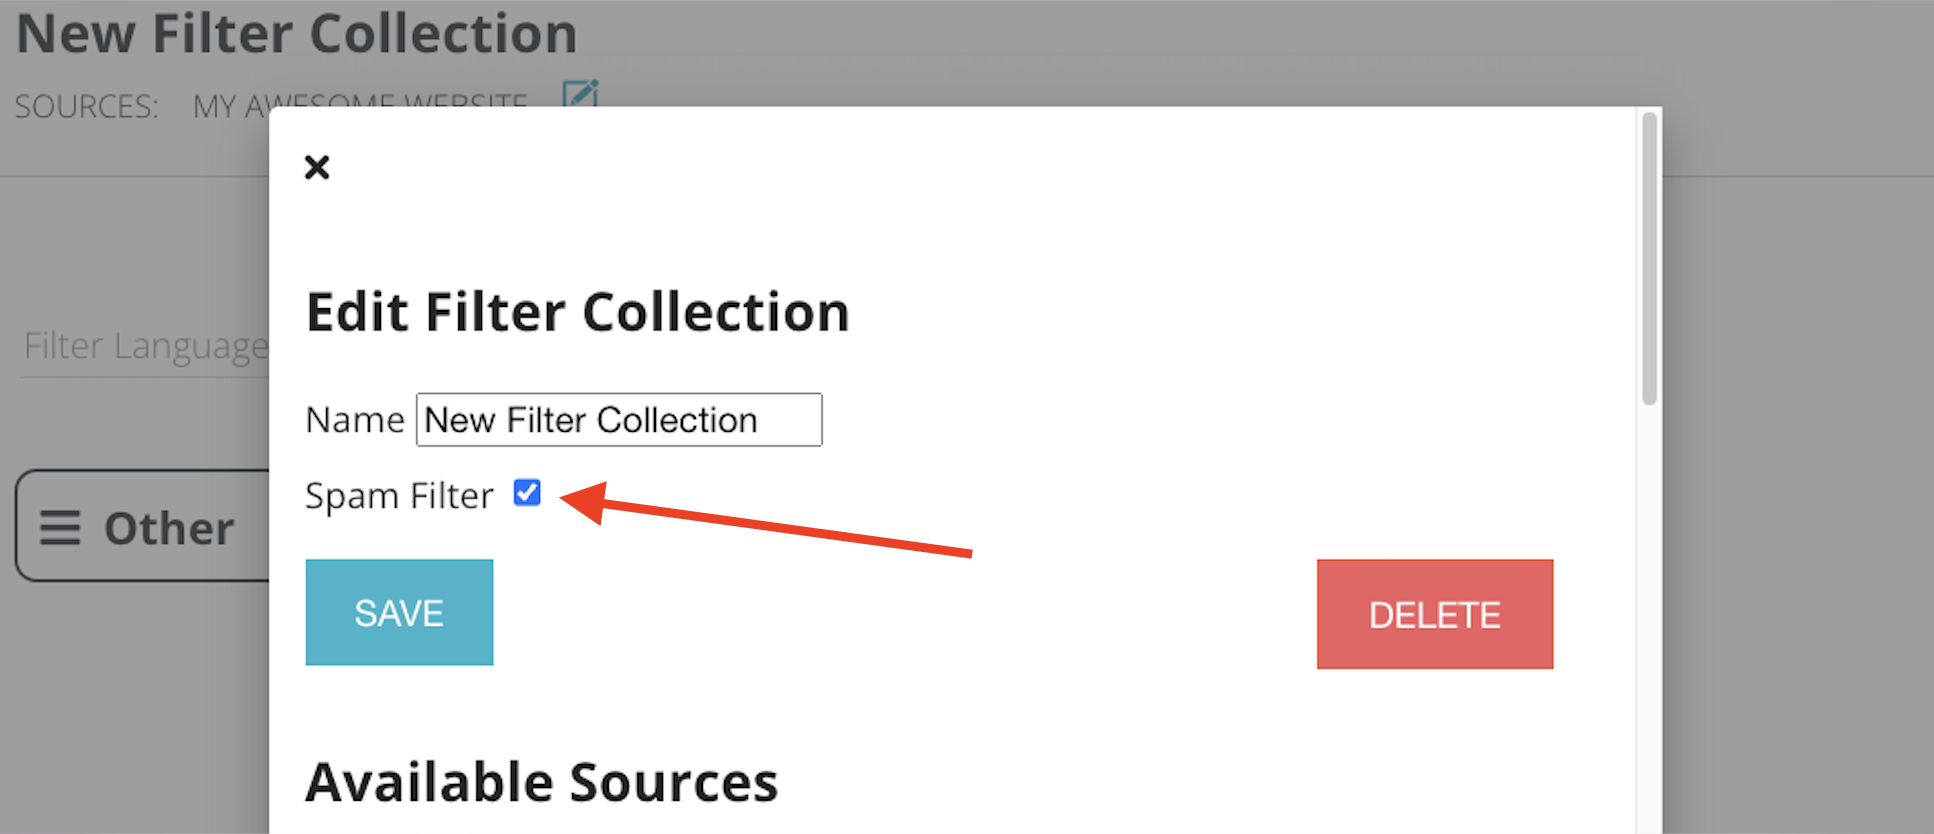
If a message comes in and we are unable to detect the language, it will be marked as SPAM if your filter collection has “spam filter” enabled or into “Other” if not. The spam filter works on email spam score (when applicable) and on language detection for everything else. Sometimes, you could have a keyword you want people to message in that might not receive a strong enough language score to pass the spam filter. You can disable the spam filter by editing your filter collection, unchecking “Spam Filter”, and then clicking save.
Language detection is a notably difficult task for computers. While our language detection will get a very large majority of your messages sorted correctly, sometimes it has difficulty when two languages are very similar and the messages are short (for instance, Spanish and Portuguese). When this happens, it can be remedied by transferring the mis-filtered conversation to the correct filter bucket.
The New Three-Step Process: How Filters Actually Work
Let's break down exactly how the new filtering system works. Every filter you create will follow three distinct steps, working like a series of questions:
1. "When should this filter run?" (Trigger)
2. "What should it look for?" (Rules)
3. "What should it do when it finds a match?" (Actions)
Our previous filter system only offered one Trigger (1st message in a conversation), a set of rules, and one action (add to a destination permission set). The new filtering system builds on that to allow additional selections for Triggers and Actions, with the potential to add more in the future.
Let's examine each of these steps in detail.
Step 1: Understanding Triggers - The "When"
Triggers are your filter's first decision point. Think of them as the doorway into your filter - they determine when your filter should wake up and start working.
New Conversations Trigger (1st message in a conversation)
Imagine a client sending their very first message to start a conversation. This is what we call a "new conversation," and it's exactly when this trigger activates.
- It ONLY works on that first message that creates a new conversation.
- It will NOT trigger for any following messages in that same conversation.
- If the same client starts another conversation later (after the first conversation has been closed), it will trigger again for that new conversation.
- NOTE: This will not trigger when a user clicks on the review and continue option with Echo Global. The new child conversation will be associated with the permission set filters of the parent (original) conversation. It will not add any new tags or other filter actions.
New Messages Trigger
This trigger is like having an attentive assistant who reads every single message that comes in.
- It activates for EVERY message from a client.
- Yes, that includes the first message (the one that would trigger "New Conversations")
- It continues working for every message that follows
- If you have "New Messages" as the trigger and the first message came in as English and is in the English team's Inbox, and then the second message comes in as French, when the second message gets filters, it will also now show in the French team's Inbox. (Filters are additive, we won't take it away from English but will apply it also to French).
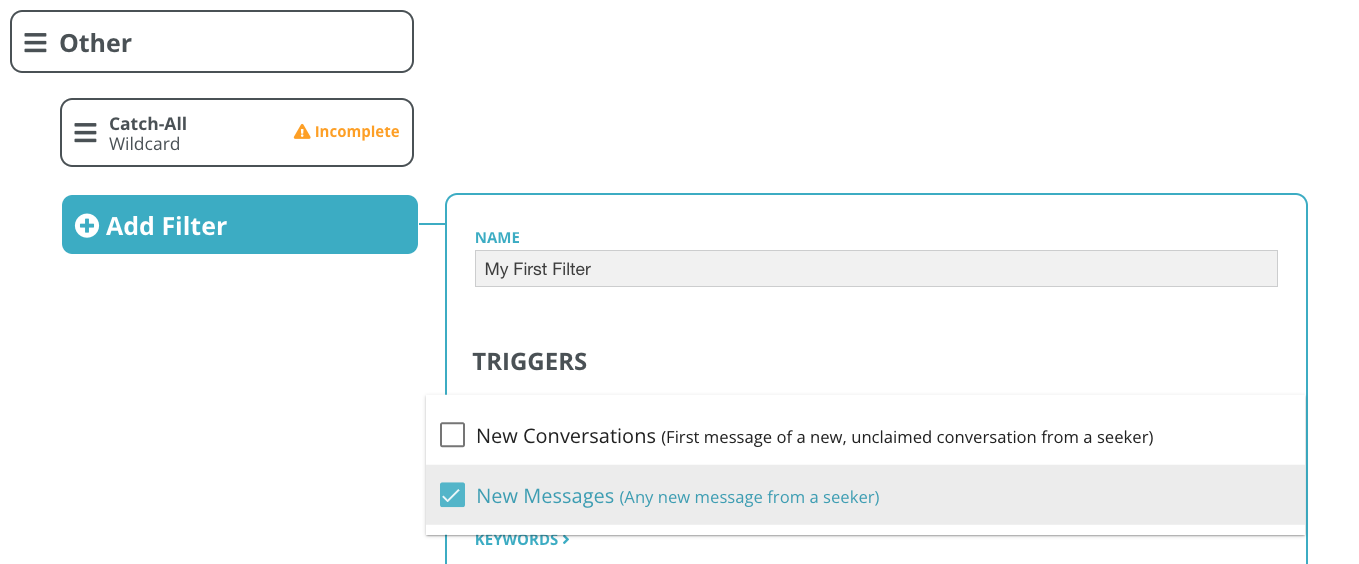
Step 2: Rules - The "What to Look For"
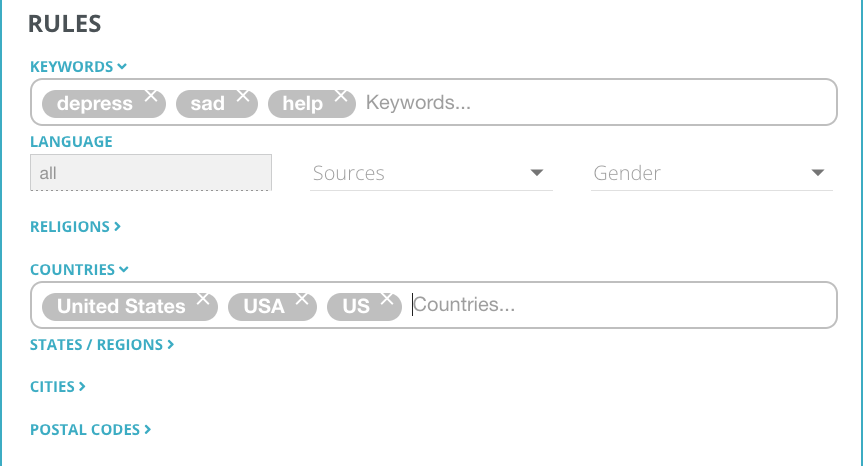
After your trigger determines when to run, the rules determine what your filter should look for. This section works exactly like the old filter system, but now it's organized under a clear "Rules" section. Here you can set up conditions like:
- Keywords - message content. Specific words or phrases (Does this message mention "Depression"?)
- Sources (narrow this filter to just one of the sources represented in the filter collection)
- Location details, such as city, state, country, postal code
- Religion Details
- Gender
Think of rules as your filter's decision-making criteria. They help your filter decide "Should I take action on this message?"
Step 3: Actions - The "What to Do"
This is where the magic happens. Once your trigger has activated and your rules have matched, actions determine what your filter does. In the previous version of the filter system, one permission set destination assignment was the only action we offered. Now, there are several options, with likely more to be added in the future.
Only one action is required to be applied to each filter, but more than one action can be applied if desired.
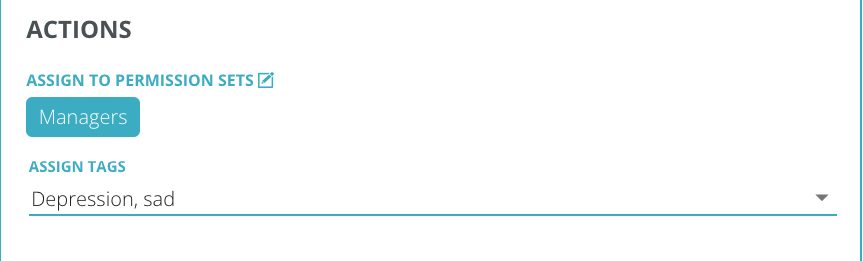
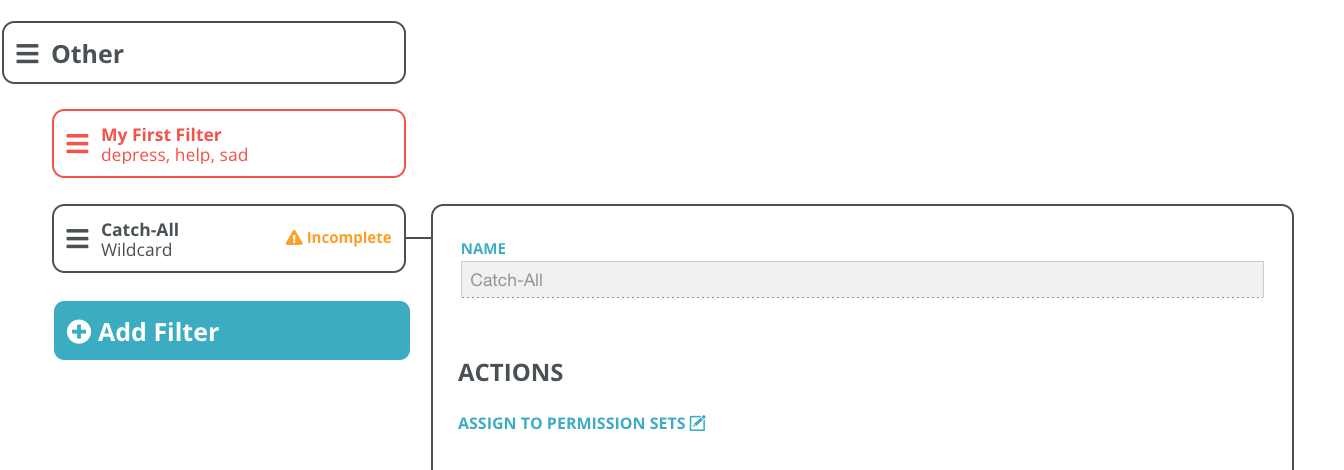
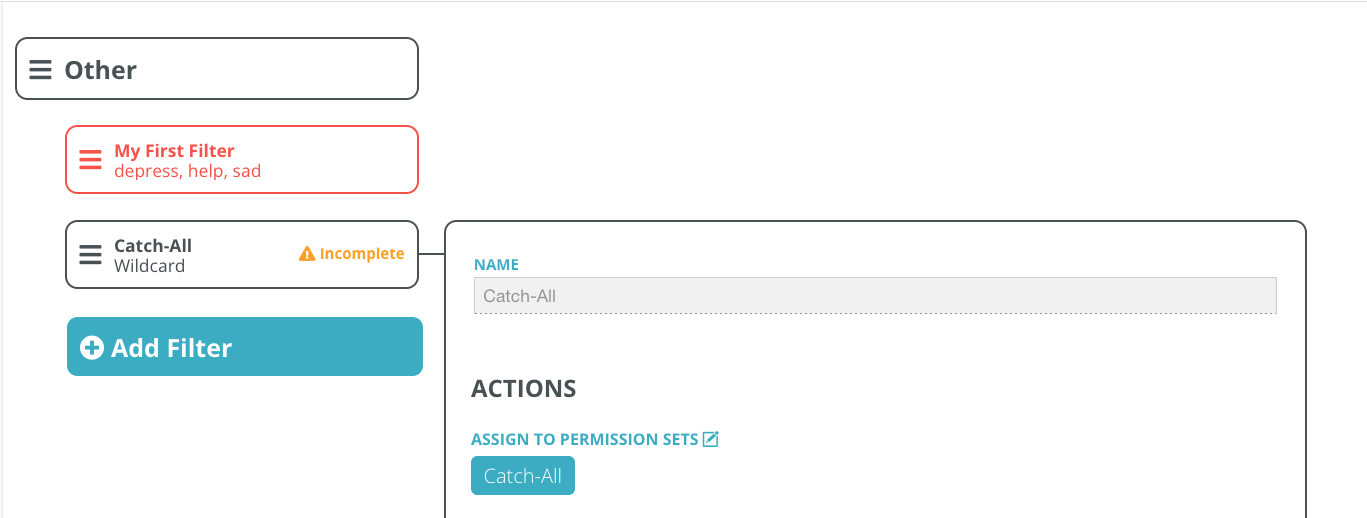
Permission Set Assignment
Think of permission sets like access passes. When you assign a permission set through a filter, you're saying "These people should have access to this conversation."
Here's what's special about assigning permission sets in the new filtering system:
- They're additive, meaning they stack up
- If one filter assigns Ministry Team access, and another filter assigns Evangelistic Team access, and the conversation meets the rules for both filters, it gets assigned to both Permission Sets
- There's no limit to how many permission sets can be added by different filters
Example scenario:
Filter A assigns: Ministry Team
Filter B assigns: Evangelistic Team
Filter C assigns: Spanish Language Team
Message meets the criteria for all 3 filters.
Result: Conversation is accessible by all three teams

Tag Assignment
Tags are like labels that help categorize and track conversations. In the new filtering system:
- Like permission sets, tags are additive
- Multiple filters can add multiple tags to the same conversation
- This is particularly useful for tracking multiple aspects of a conversation
Example Scenario:
Copy
Filter A adds tag: "Depression"
Filter B adds tag: "Spanish-language"
Filter C adds tag: "Sad"
Message meets criteria for all 3 filters.
Result: Conversation has all three tags for easy categorization
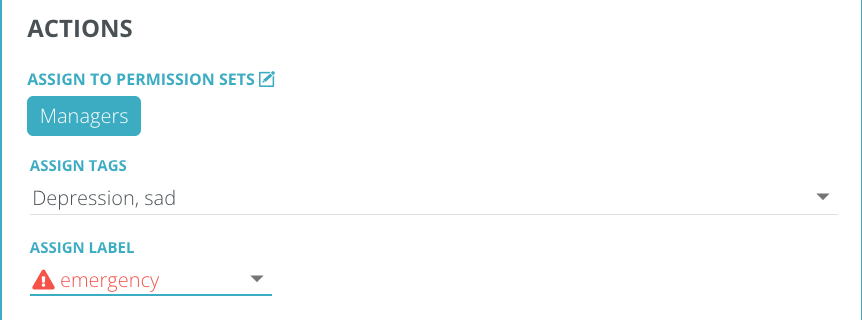
Filter Label Assignment
Unlike tags and permission sets, labels work on a priority system. Think of labels like a way to highlight certain types of conversations and their priority in the Echo Inbox. See our help document on creating custom filter labels.
Here's how it works:
- Only the highest priority label remains
- Once a high-priority label is assigned, lower priority labels won't override it
- You can still change labels with filters that run later, but only if they're higher priority
Example scenario:
Copy
Filter A assigns: "General Support" (Priority 1)
Filter B assigns: "Urgent" (Priority 3)
Filter C assigns: "Standard" (Priority 1)
Result: Conversation shows "Urgent" label because it's highest priority
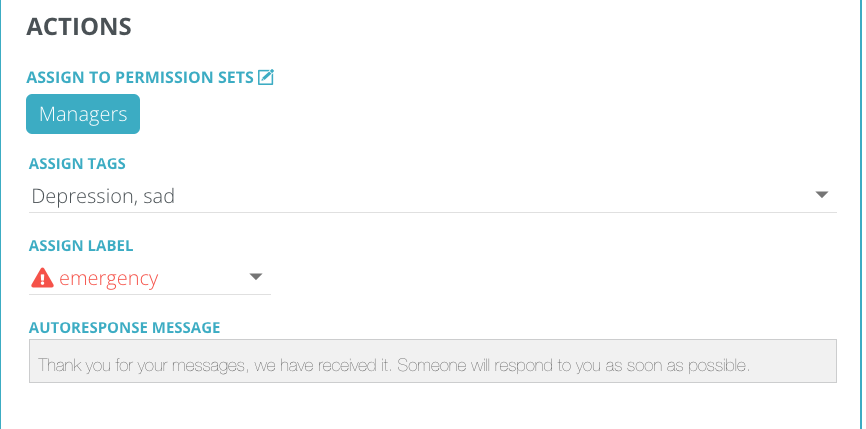
Response Message Action
You will now be able to set up a one-time automatic response for each filter. This could be useful for:
- Sending acknowledgment messages (“We got your message, we’ll response to you soon.”)
- Providing immediate helpful information (“You’ve reached ___ Ministry. We are a Christian ministry that exists to talk with interested people about Jesus. Let us know how we can help”)
- Setting expectations about response times (“Our prayer team is praying with other people, but we will respond to you just as soon as we can.”)
Understanding Sequential Processing - The Big Change
One of the most important changes in the new filtering system is how filters process in sequence.
Let's break this down:
Old System (Before):
- Filter A matches → Apply actions → Stop processing
- Any other matching filters were ignored
- Only one filter's actions could ever apply
New System (Now):
- Filter A matches → Apply actions → Continue to next filter
- Filter B matches → Apply actions → Continue to next filter
- Filter C matches → Apply actions → Continue
- All matching filters get to apply their actions
Think of it like a series of helpful assistants, each looking at the message and adding their own tags, permission sets, or trying to apply their label if it's more urgent.
Example Scenario:
Message: "I need help with my prayer group's billing account"
Filter A (Billing):
- Matches "billing"
- Adds Billing Team permission set
- Adds "billing-question" tag
Filter B (Prayer Groups):
- Matches "prayer"
- Adds Ministry Team permission set
- Adds "prayer-group" tag
Result:
- Both teams can access the conversation
- Both tags are applied
- Message is properly categorized for both aspects
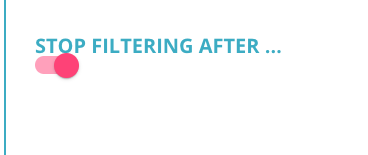
Hard Stop Option
This feature will give you more control over filter processing:
- It will be a checkbox in the actions section
- When checked, no more filters will process after this one
- Existing filters will have this checked by default (to match old behavior)
- New filters will have it unchecked by default
Understanding the Catch-All System
The catch-all filter is your safety net. Here's exactly how it works:
1. A new message comes in
2. The system tries all your regular filters
3. If NO filters match at all, then and only then does the catch-all activate
This makes sure no message is left unattended (hidden from all users):
- If all other filters say "not my job," the catch-all steps in
- It ensures every conversation has at least some basic routing
- It only works on first messages to help establish initial routing
- If other filters match, but don't have a permission set selected, the conversation will also be added to catch-all to make sure someone can have visibility on it.
- You will want to make sure your catch-all filters always have a destination permission set applied. (If you haven't added one, the catch-all filter will show as Incomplete).
Performance and Technical Details
You might wonder: "Won't all this filtering slow things down?" Here's how we've made sure it won't:
1. Asynchronous Processing
o Messages are delivered immediately
o Filtering happens in the background
o Your clients won't experience any delay
2. Efficient Design
o Language detection (via Amazon API) is the slowest part
o Filter matching is highly optimized
o We only pull necessary data
3. What to Watch For
o High message volume situations
o Complex language detection needs
o Multiple filters with complex rules
Best Practices for Setting Up Filters
Planning Your Filters
1. Start with a clear goal:
o What are you trying to identify?
o What should happen when identified?
o Which teams need access?
2. Choose Your Trigger Wisely:
o Need first-message routing? Use "New Conversations"
o Need ongoing monitoring? Use "New Messages"
o Remember: "New Messages" includes first messages too
3. Set Specific Rules:
o Use exact phrases when possible
4. Think through the best action or actions for the messages that will go through the filter.
o Keep in mind that if your message matches more than one filter, the actions will be applied from all the filters it matches unless you select “hard stop”.
o Make sure you don’t have any conflicting actions. (Do you have an auto message going out from every filter? If so, one client could get the same message multiple times if their message matches multiple filters).
Common Scenarios and Solutions
1. Language-Based Routing
Trigger: New Messages
Rules: Detect Spanish Language
Actions:
- Assign Spanish Support Team permission set
- Add "Spanish-language" tag
2. Priority Customer Handling
Trigger: New Conversations
Rules: Match VIP customer domains
Actions:
- Assign VIP Team permission set
- Apply "Priority" label (high priority)
- Add "vip-customer" tag
3. Topic-Based Tagging
Trigger: New Messages
Rules: Match keywords (prayer, support, guidance)
Actions:
- Add relevant tags
- Don't use Hard Stop
- Allow other filters to add more context
Troubleshooting Common Issues
If your filters aren't working as expected, check:
1. Are your triggers appropriate for your needs?
2. Are your rules specific enough?
3. Are your actions properly configured?
4. Is a higher-priority label overriding your label?
5. Is another filter's Hard Stop preventing your filter from running?
Need help? Don't hesitate to test different approaches using the clone feature - it's a great way to experiment without risking your production filters.