Phone and Voice Calls Setup

Phone Numbers:
If you want to use your existing (non-Echo) phone numbers and if they are able to be ported over into Echo, talk to us about the steps involved to do that.
Local, Mobile, and Toll-free numbers are available for purchase within Echo’s admin interface (Admin>Phone Numbers) and allow you to interact via voice, sms, and short code.
Purchasing a local phone number for some countries is not available through Echo because of special circumstances within Twilio. Please contact us if you are wanting to purchase a non-US phone number and there isn’t one listed in Echo.
Setting Up Your Phone Number in Echo
Once you've purchased a phone number in Echo, there are a few things you will want to do to further set that number up for your ministry use. You may want to give you number a "friendly name", something that will be easy for your Echo Users to recognize when a call comes in. You will want to determine and set up a call flow and determine if you want to record your calls. If you plan to use your phone number for SMS, you will want to fill out the brand and campaign information. Lastly, you will want to add the number to the appropriate permission set. We will get into the details of each of those below.
Creating a "friendly name"
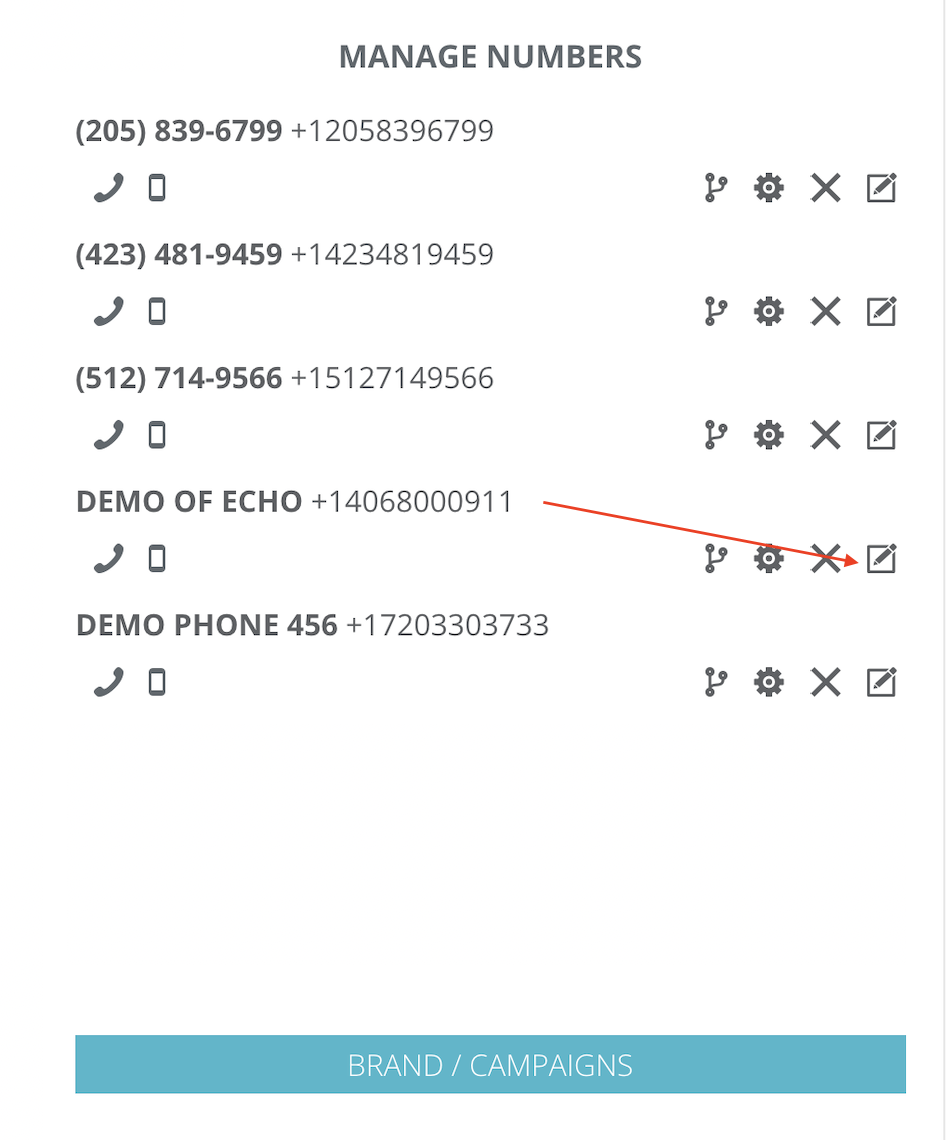
From the Admin-Phone Numbers area of Echo, look for the Manage Numbers section. From there, find the number you want to work with and click the edit square next to that number.
Under "Name" type in the name you want your Echo User's to see when a call comes in. This name should help clarify to the user where this call is coming from.
From this area, you can also select if you want to allow use of this number for outbound calling (when selected, it will show up in the list to the Echo User of phone numbers that can be used to call someone from Echo).
You can also choose to select Record Outbound Calls. If this option is used, make sure you notify the person on the other end of the line that the call is being recorded.
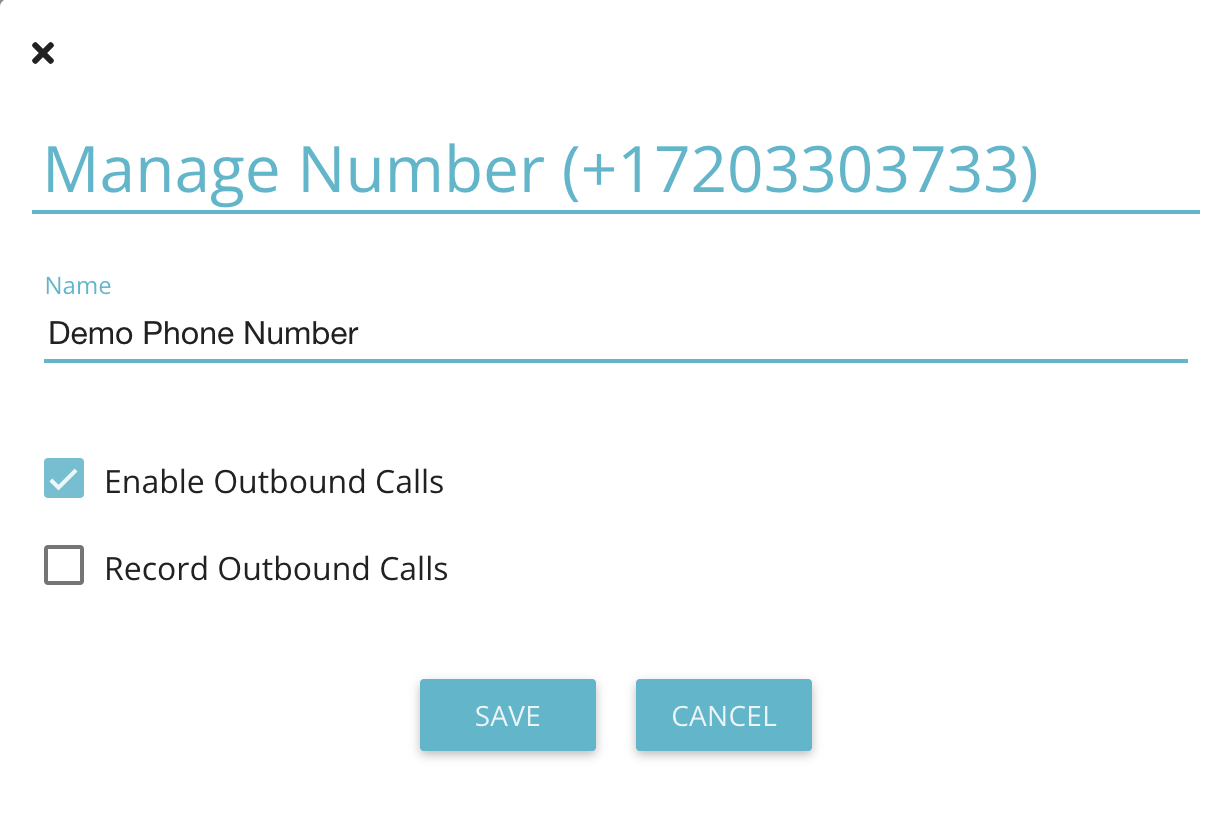
Click save to save your selections and close the box.
Managing the Call Flow
The call flow is a simple way for you to manage what happens when the seeker dials your phone number. What messages do they hear? When does it show up in the queue in the Inbox for you to be able to answer it, and what happens if no one answers it?
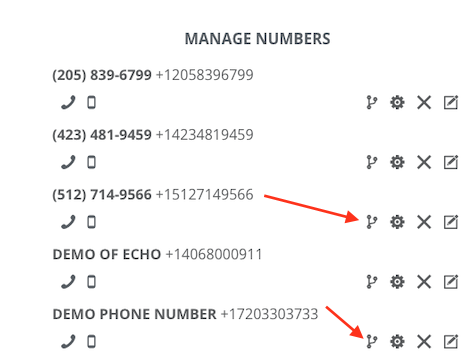
After you log into Echo, go to Admin - Phone Numbers and find the area where you can manage the phone number. You will see an icon that looks like a network symbol (three nodes connected with lines). Click on this to open the call flow area.
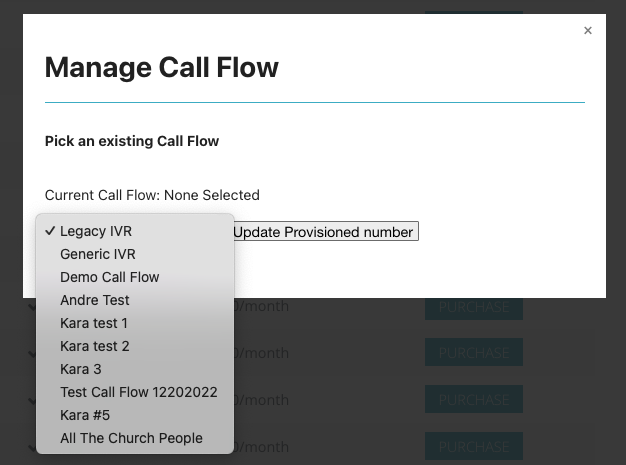
You're going to see legacy IVR and generic IVR, Legacy IVR is going to show up for those users that have been using Echo before this feature has been released. Generic IVR is going to be the IVR that just says thank you for calling "Echo Global", Please wait while we try to get someone to answer your call. Probably neither of these is what you want to use moving forward, and instead, what you want to do is manage your call flows.

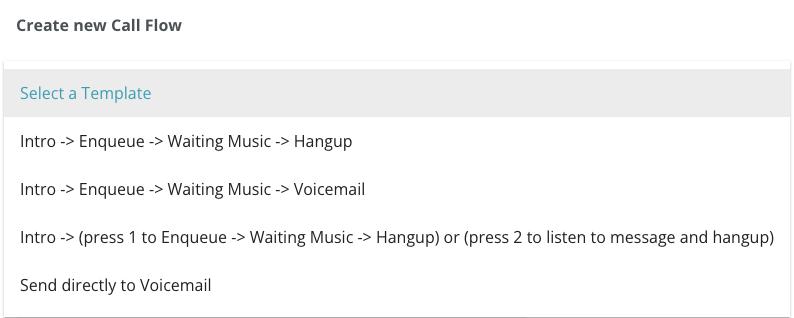
Now you want to create a call flow. To do this, first select the template you want for your call flow. There are 4 options:
- Play an intro audio and then enter an in queue status, which will play a waiting message (often that's music) to the caller while waiting for someone to answer the call, and then it will hang up if no one answers.
- The second one is very similar to the first, except it goes to a voicemail instead of just hanging up.
- The third one allows the caller to press 1 to go into a waiting mode for someone to answer, and if no one answers, they can hang up or press two to listen to a message and hang up. We've seen this primarily used with ministries that maybe want to offer to a much smaller segment of their population that's calling in that speaks a different language, a way to press two and listen to that message in French, for example. And at the end, it would play the gospel message and then hang up, because there's nothing to do.
- The 4th option is to send calls directly to a voicemail message without trying to connect to a person.
Once you've determine the template you want to use, you will want to upload the audio clips you will use in that call flow template.
Keep length in mind as you create your audio files. For example:
- The Intro Audio will play before the call goes into the queue process, so you will want this very short, only the most important info a caller might need to know before connecting with your team (example: "You've called _____ ministry. Call is being recorded for quality assurance.") Consider making this less than a minute long.
- The Waiting Message will play while the call is connecting, which can take possibly up to a few minutes. You will want to make it long enough to give your team time to connect with the caller. We do have a looping option, so if you create your waiting message in a way that it can be repeated, you can make it shorter and then add looping to extend the time.
- If you use a voicemail option, your voicemail audio should provide instruction for what you would like them to leave in a voicemail.
To upload your audio files, scroll down to the bottom of your call flow page and click on +Click to Upload New Audio File. These uploaded files will fill in below this area.


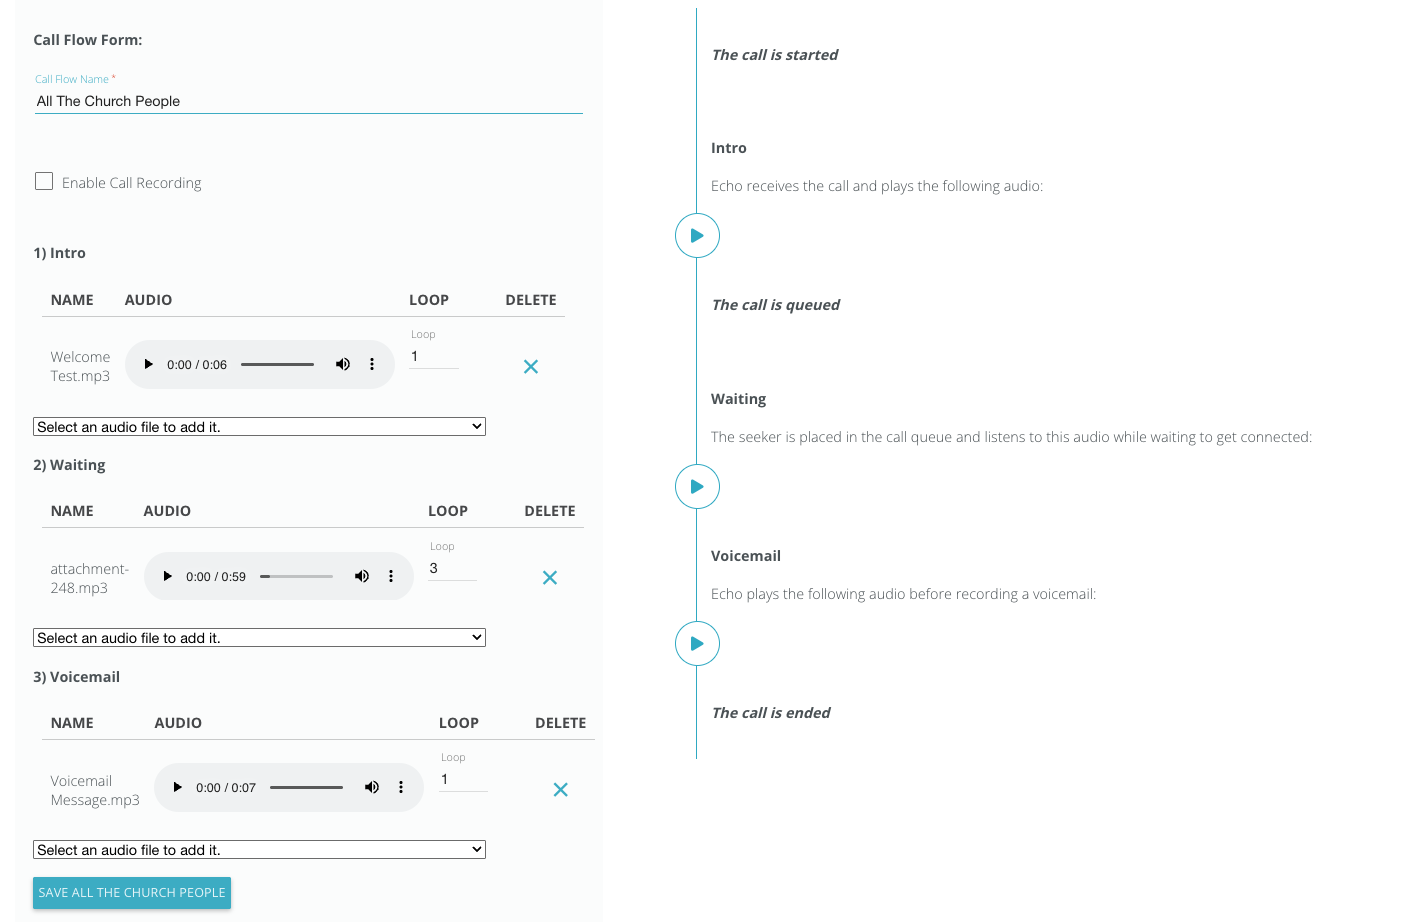
Now that you have your audio files uploaded to Echo, you're ready to finish creating your call flow template.
Give your call flow a name. If you end up having more than one phone number and you want a different call flow for each, this name will help you determine which call flow you want to use for which number.
Next, determine if you want to enable call recording. If you do enable call recording, make sure that you are following local regulations and rules to laws, to make sure that you've announced, if needed, that you are recording the call.
Now you can begin adding the proper audio file to each part of your template. Use the drop down to select the audio file you want to select for each part of your call flow. Once added, you can play the audio file to see what it sounds like, and you can determine how many times you want the audio to loop (if at all).
You can also delete the audio file from the template here if you've added the wrong one, or want to change it out for a different one.
Now that you've set up your call flow, you can see to the left what the flow will be like for the caller. If everything looks good to you, click on the Save button at the bottom of your template.
Once the template is saved, you will see it as an available option on the first call flow selection screen. Click back to Phone Numbers in Admin. Find your phone number under Manage Phone Numbers, click on the call flow icon, and now you can select your newly created template for the phone number and then click on "update provisioned number" to save that call flow with that number.
Fill out the Brand and Campaign Information
You only need to set up your brand and campaign information one time. Once approved, the information will automatically be applied to all of your phone numbers.
To submit your brand information, click on the Brands/Campaigns button found at the bottom of the manage phone numbers area in Admin-Phone Numbers. For the instructions on the form and then submit. If it fails the first time or if you have questions, please reach out the Echo Support support@echoglobal.org. Your brand information has to be in approved status before you can then fill out your campaign information.
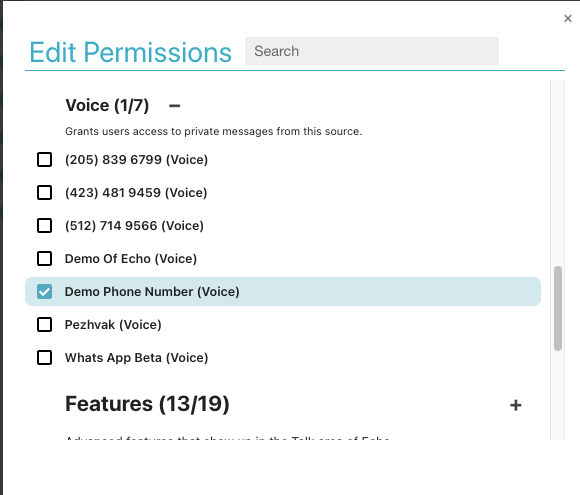
Add Phone Number to a Permission Set
When you are ready to start taking calls from your phone number, remember to do to permission set, and select the voice source for your phone number to add it to the permission set. This is what give your users permission to see/claim/respond incoming phone calls. See below for other permissions options for voice calls.
Setting up Voice Permissions:
There are different permissions for certain voice functionality within Echo. This allows you to have different permission sets for different groups of people. We will talk through each permission set in Echo that is specific to the voice calling functionality.
Dialer - A dialer will be added to the voice call menu so that the user may dial an outbound phone number.

Hide Phone Status Toggle - This hides the toggle that allows Echo users to mark themselves as unavailable for inbound voice calls.

Call Based Dispositions - Allows an Echo user to select a call outcome via a dial pad based IVR instead of the Echo app.
Include Missed Calls in Inbox - Shows missed phone calls as new conversations in the Echo Inbox.
Outbound Calling Through Echo Phones - When enabled, if a cell-phone-only Echo user is connected, they can call a phone number back and it will show as coming from the phone number provisioned in Echo so that it masks the Echo user's personal cell phone number.
Voice Queue - When Echo user has access to voice/phone, this enables the voice queue (pending callers and available users) display in the main talk area.