Echo Overview for the Echo User

About
If you are new to Echo Global, you may be wondering how to navigate through the system and how everything works. This document will give you an overview of the main areas you will be accessing as an Echo user.
If you prefer to learn in video form, you can view our "Echo Overview" Video here (written documentation is more comprehensive):
Echo is created, tested, and supported on the following web browsers: Google Chrome or Safari web browsers. Therefore, we strongly encourage you to use one of these two browser types.

The Echo Dashboard
When you log in for the first time, you’ll see the dashboard, or home screen. There you will see various icons, a News and Updates text box at the top of the page with any recent news and information, and the logout button at the bottom of the page.

Whenever new items are posted in the News page, the system will automatically take you to this area. You may need to scroll down to read the updates. If there are no new items since your last session, Echo may take you directly to the TALK screen when you log in.
No matter where you are in Echo, you can always get back to the dashboard by clicking the three horizontal lines—or menu icon—next to your name in the upper left corner of the screen.

Echo Account
To access the Account area, click once on the Account Icon. When you are done with the Account area, click once on the Account Icon to close the area.
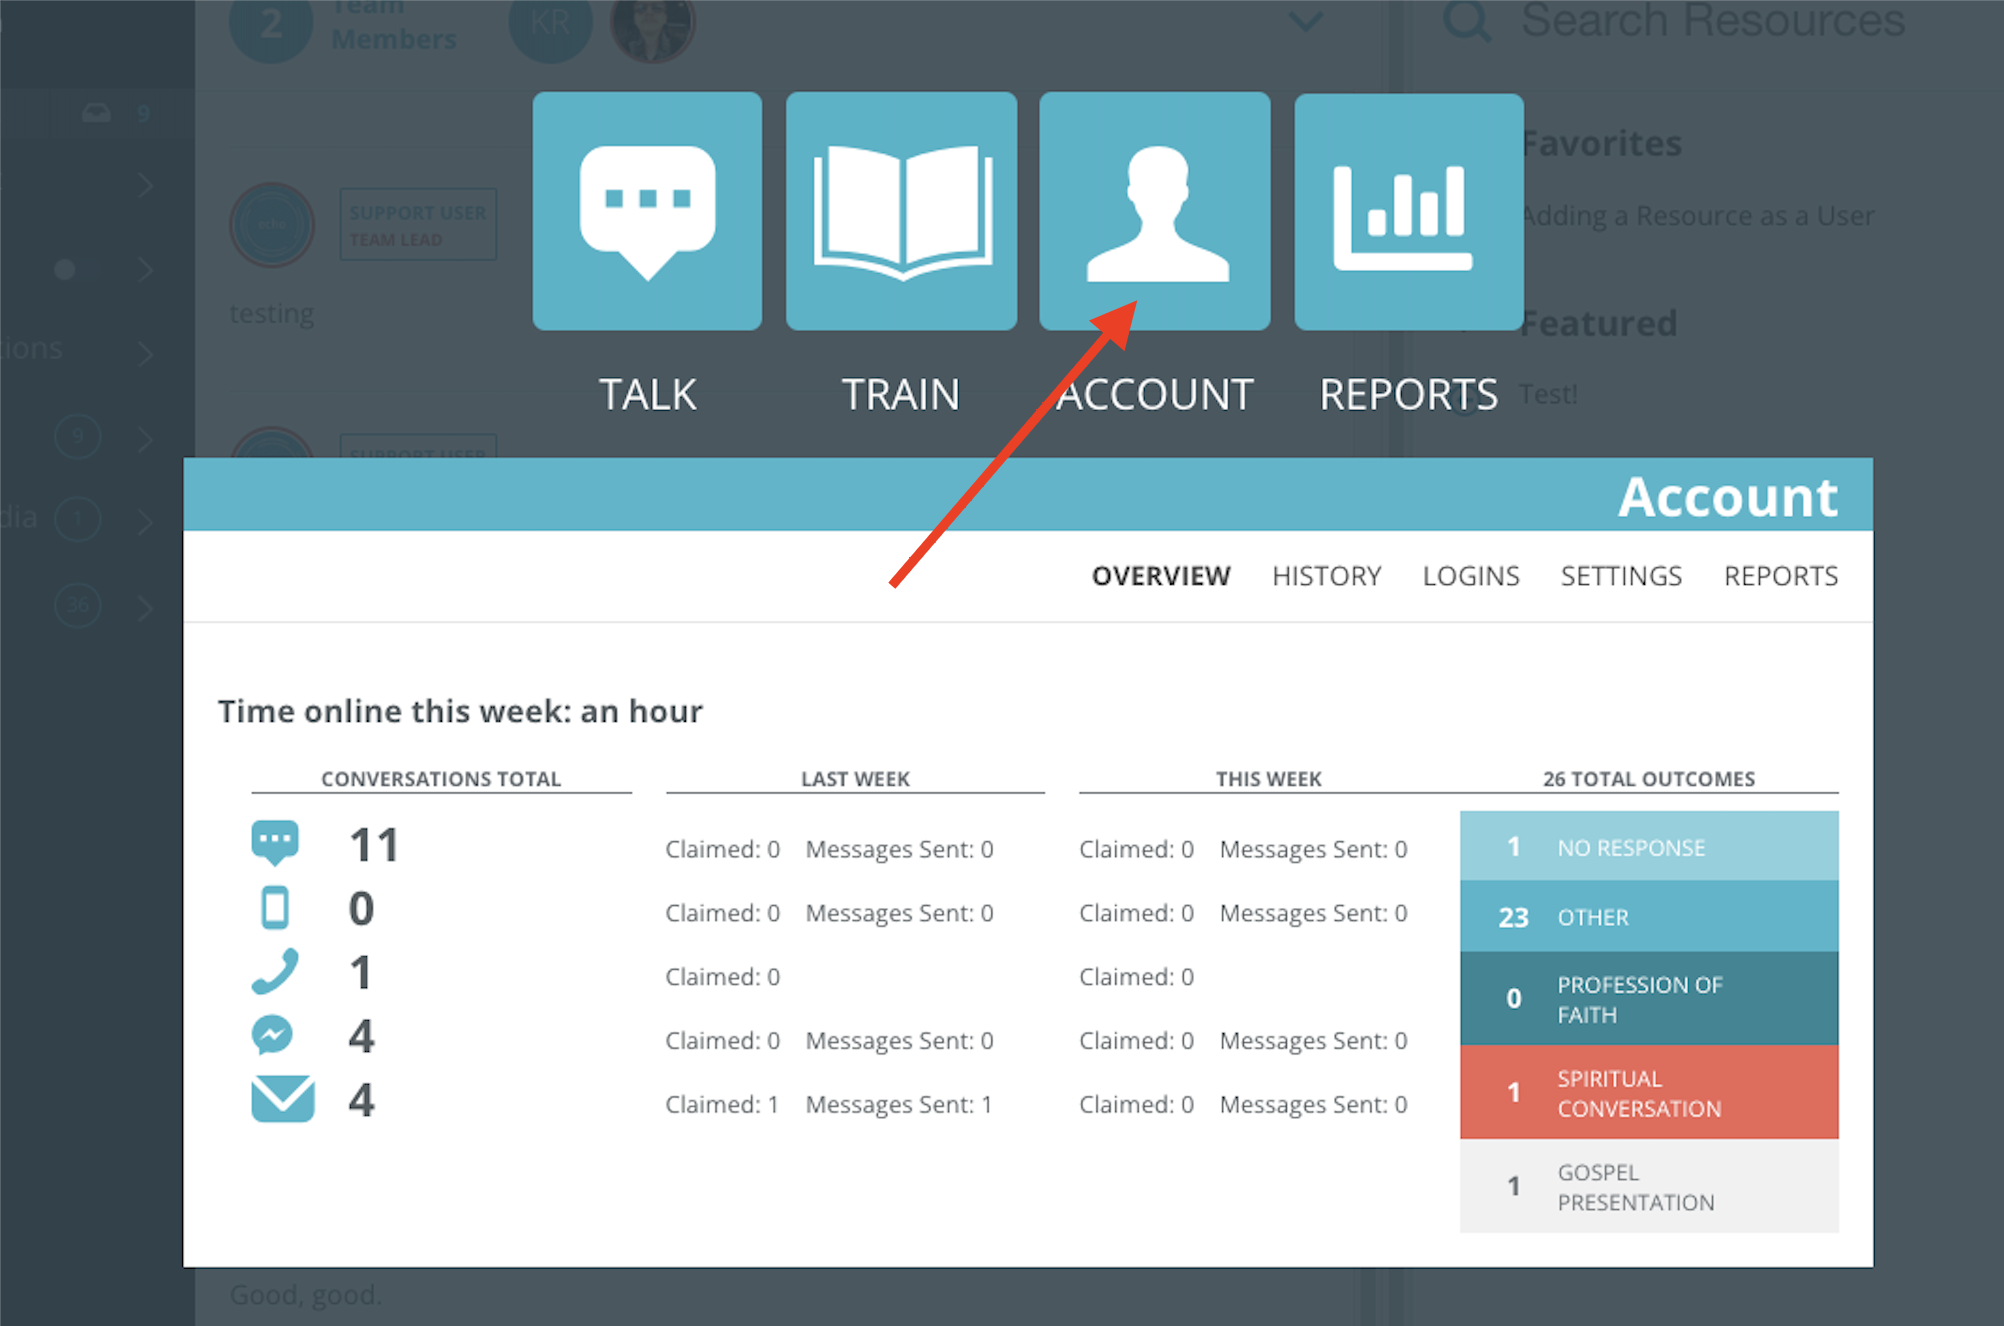
Overview:
In the Overview area, you can track your ongoing conversation activity. You can see your total completed conversations; follow your recent activity of claimed conversations and responses sent.

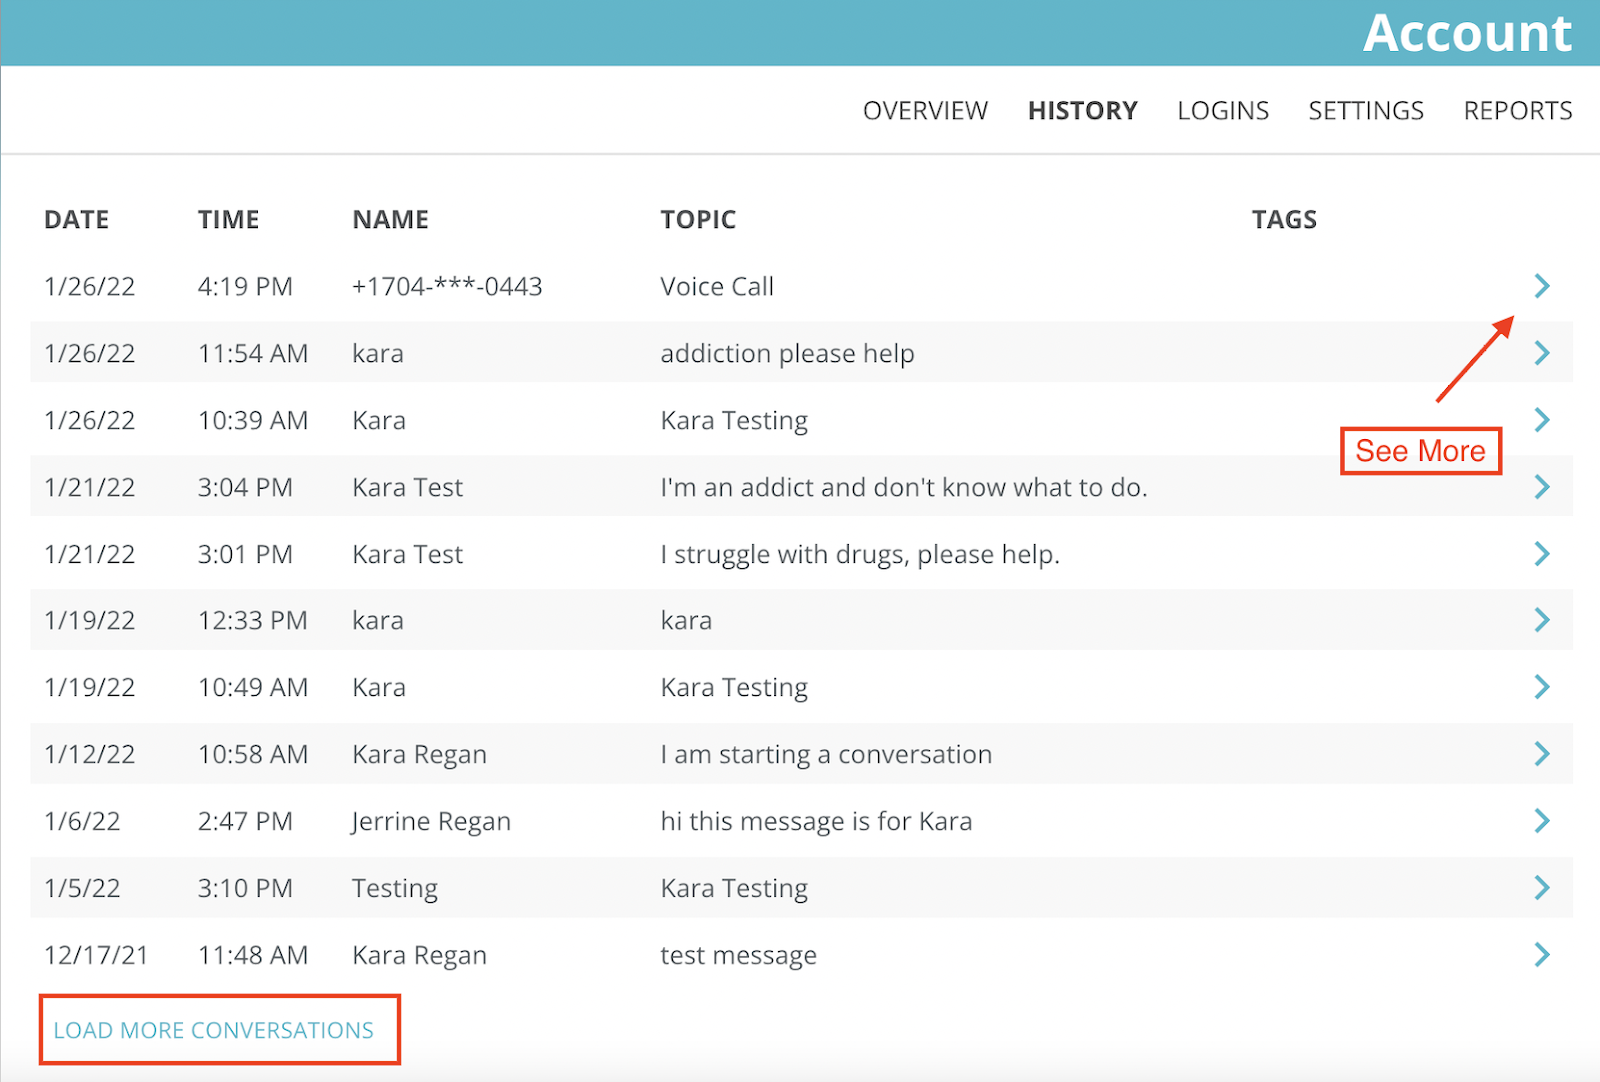
History:
The History tab allows you to see all the transcripts of your completed conversation. Click on the arrow to open the transcript you want to view. To see older conversations, scroll to the bottom of the visible conversations and click on “Load More Conversations”.
Logins:
The Logins tab is a personal record of your Echo login activity.
Settings:
The Settings tab is the area where you can change your account settings, like password, language, and profile picture. Settings also lets you see what role and groups you have permission to communicate with.
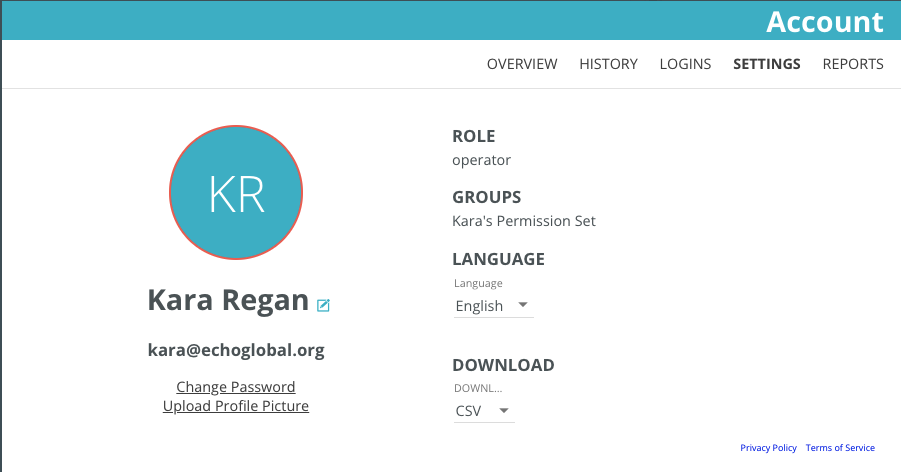
Changing Password - If you want to change your password, click on the Settings tab. Then click on “Change Password”. Fill in the blanks and Click-Save.
Changing Name - For privacy and cyber security purposes, online clients will only see your first name (chat and email) so do not worry about removing your last name. However, other Echo users and staff will see your full name (which is necessary for reviewing and reporting your work properly). For SMS and Social Media, the client will not see your name at all unless you provide it to them because you are responding on behalf of the page or the phone number.
If you prefer a pseudonym show to a client rather than your first name, one can be added here.
Profile Picture - If you choose to upload a profile picture, this will only be visible to other Echo Users. Your picture will not be shown to clients.
Role - This is your access level in Echo set by your Echo Administrator. There are currently three levels: Operator, Manager, Administrator.
Groups - These are the access/permission groups you have been added to by your Echo Administrator. Groups give you access to the type of conversations you can interact with and any additional feature permissions.
Language - This lets you change your system language. The Echo User areas have been translated into many different language. Your account will default to English, but can be changed to any language your Echo Administrator has assigned to your system.
Download - If you pull reports in Echo, this setting determine if your reports export will default to a CSV file or an XLSX file.
Reports:
If you have an access level that provides you certain reports within Echo, those reports will be displayed here.
Echo Train
If your organization has created training content within Echo, you will find that content in the Train Icon area.

Echo Talk
Clicking the Talk Icon will take you to the space where all of your conversations will take place, and where you will spend the majority of your time in Echo.

The Talk area is broken into 3 main areas
- The menu area where you will find, claim, and manage your conversations.
- The conversation area where you will be typing and reading messages in your active conversations.
- The resources area when you can find resources provided to you by your Echo Administrator, or you can add your own resources to help you with your conversations.
We will explain each area in detail below.
The Menu Bar
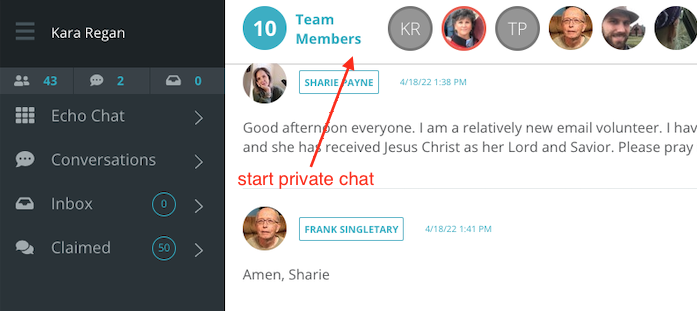
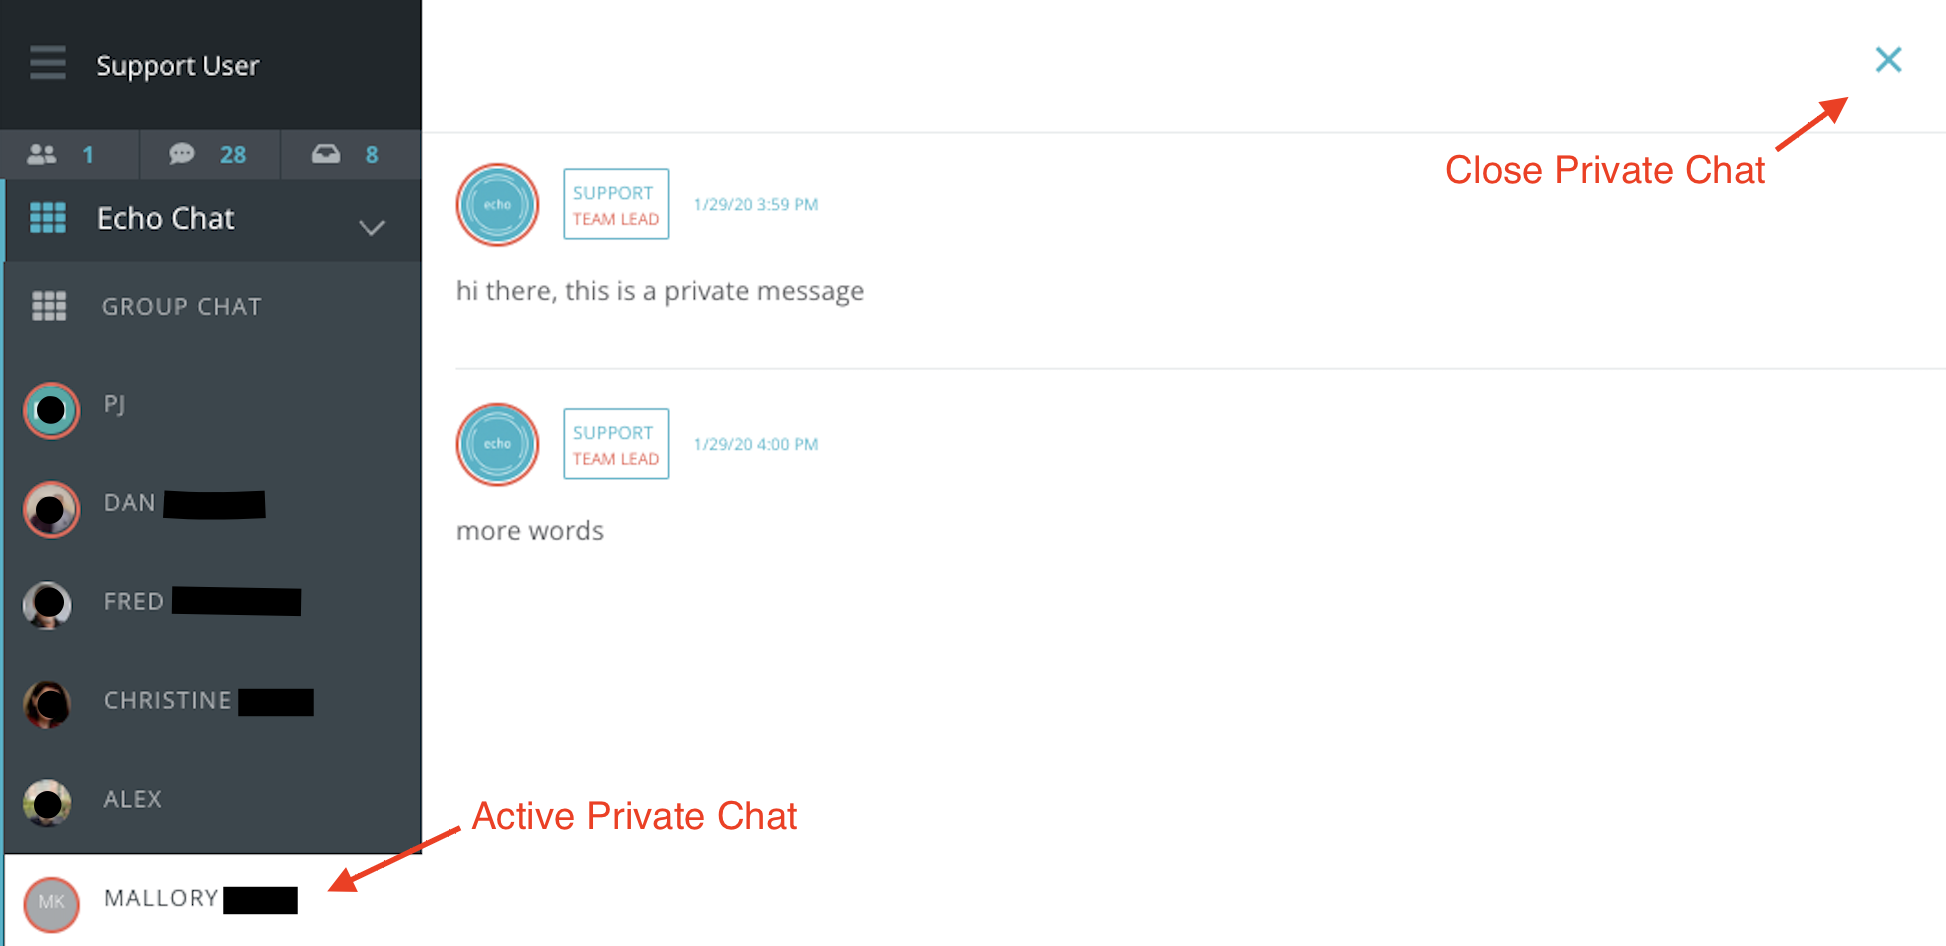
Echo Chat - Under the Echo Chat drop down, you will find two kinds of conversation options; group chat and Echo User private chats.
- Group Chat is the default conversation happening in your conversation area when you enter Talk. This is an ongoing public conversation by your fellow Echo users. You can join the conversation if you'd like. Your Echo Administrators have the ability to monitor, edit, or add to this conversation. Messages in group chat will be seen by any users in your Echo system, but cannot be seen by external clients.
- Private Chats between yourself and another Echo user one-on-one can also be found under the Echo Chat drop down, if you have any. As its name describes, private chats can only be seen by you and the Echo user that you are talking with. Private chats are started by clicking on the profile picture or the user name displayed at the top center of the Talk area. They can be closed by clicking on the X in the upper right of the conversation, or can remain open for ongoing conversation.
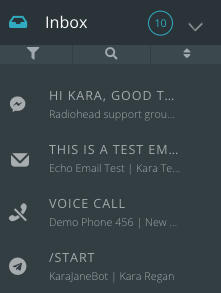
Inbox - Under the Inbox drop down menu is where you will find new, incoming conversations from clients. You will only see conversations in this area that you have permission to see based on your permission groups.
If you have permission to engage in conversations from multiple conversation sources, you will be able to distinguish those sources by the source icon and name shown in the message box.
Some source types have a one-click claim (chat, social media) meaning once you click on the message box, you have claimed the conversation and can type a reply. Other source types (email, SMS) have a two-click claim, meaning you can click on the message box once to see additional information and then you can click the "claim" button so that you have fully claimed it for response. Or, you can click "cancel" to drop it back into the Inbox for someone else to claim.
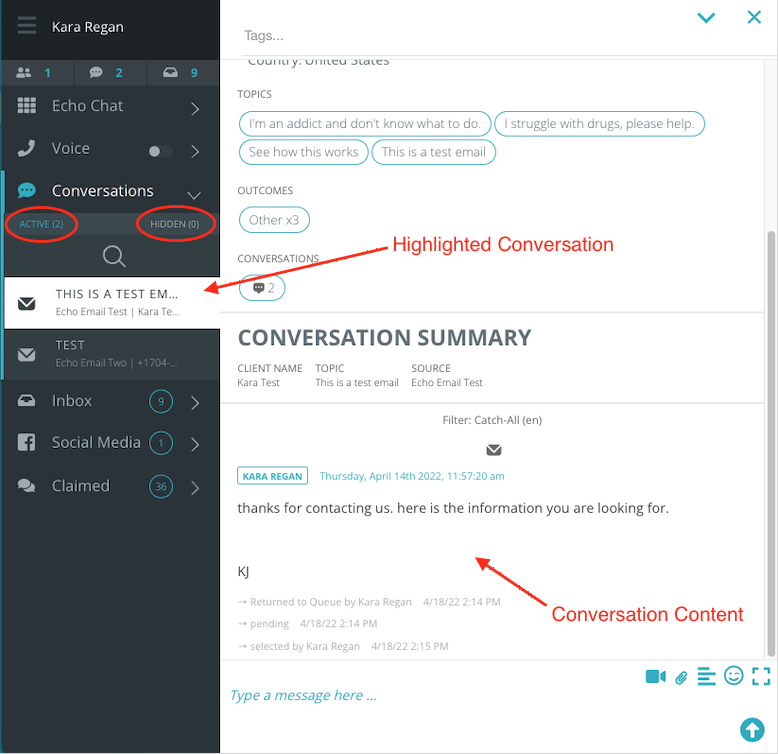
Conversations - Once you have claimed a conversation from the Inbox, it will move to your Conversations menu. When expanded, you can see all of your active conversations and can access any hidden active conversations you may have.
This list defaults to your "active" list, but you can toggle between your active and hidden lists by clicking on the word "active" or "hidden".
To read or response to an active conversation, click on the message box to highlight it. The existing conversation content will show up in the middle conversation area for the conversation you have highlighted.
Voice, Social Media, and Claimed - These are menu items you may or may not see depending on your group permissions.
Voice - only visible if you have permission to make and receive phone calls through Echo.
Social Media - only visible if you have permission to see and interact with comments under social media posts. (Social Media direct/private messages will be found under Inbox.)
Claimed - only visible if you have permission to see and review Echo conversations that are not your own.
The Conversation Area
Located in the center of your screen, the conversation area is where you will engage with your active conversations by reviewing the information available and replying to messages.
We will look at the conversation areas in sections, starting at the top.
Tags, Conversation Actions Drop Down, Close

Tags - At any point in your conversation, you can add tag words/phrases that have been set up by your organization. Tags can be keywords or categories that help your organization understand the kind of conversations your team is having and determine trends.
Conversation Actions Drop Down - What you see in the drop down/carrot menu when you click it is dependent upon the conversation source and the permissions your Echo Administrator has set up. It can contain things like "block seeker", "Transfer", or "Emergency: Alert Admins Now". We will discuss definitions for all of these actions in a separate document.
Close Conversation - To close/end any active conversation, you can do so by clicking on the X. The X will end the conversation and bring up a summary report for you to fill out about the conversation.
Load History, Client Summary
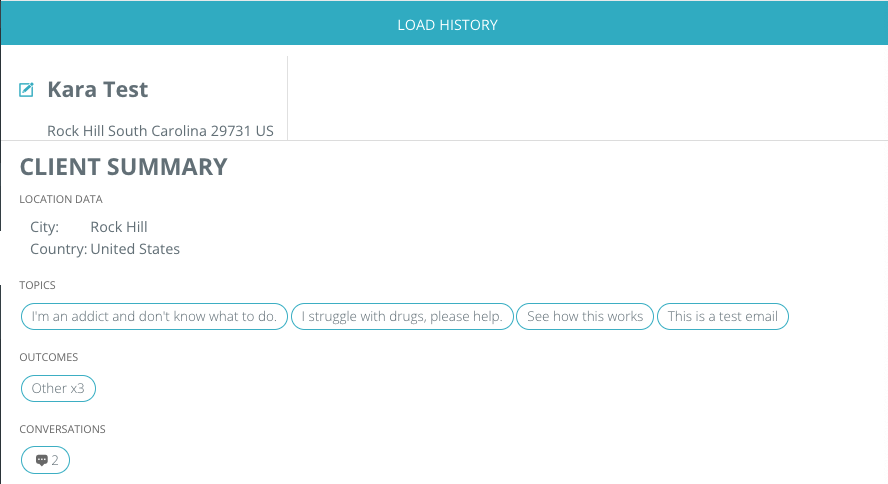
If the client has spoken to us previously, using the same IP Address, Phone Number or Email Address, Echo can provide details of their previous encounters.
Load History Bar - Click on the load history bar will bring up conversation transcripts from the client's previous conversations.
Client Record - Shows the Client's Name and basic information. If you find out updated information about the client, you can click on the edit icon and type in that new information.
Client Summary - Shows current location data, if available (determined by IP Address). It also shows information from any previous summary reports submitted about this client, including previous conversation topics, outcomes, notes, aliases and conversation types (chat, email, etc.).
Conversation Summary, Conversation Content
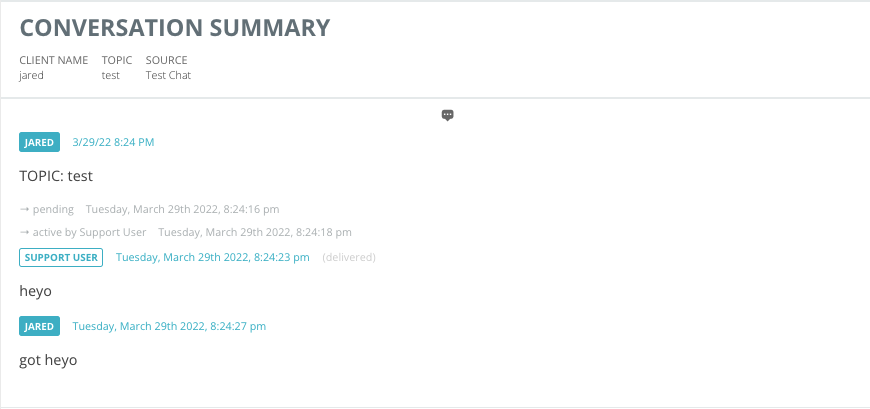
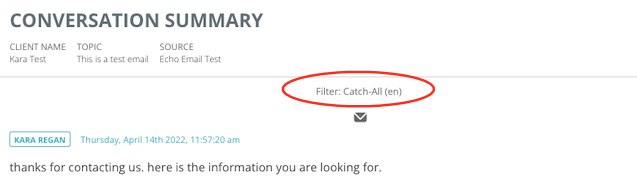
Conversation Summary - This shows the same information you were able to see from the message box before claiming the conversation. it includes the client name and the client topic (as given to us by the client).
- Client Name may display as a partial phone number or email address if client is contacting us via SMS, Voice, or Email. Client name for Social Media is usually their social media account name. For chat, the client types in their name.
- Client Topic is the first few words from the first message the client sends.
- Client Source shows the display name of the conversation source through which the client entered.
Filter - If your Echo Administrator has enabled filters and the message went through a filter, that filter name will display at the top of the message. Only the first message in a conversation will go through filters.
Conversation Content - The main contents of the message, and any conversation that happens after the first message until the conversation is closed.
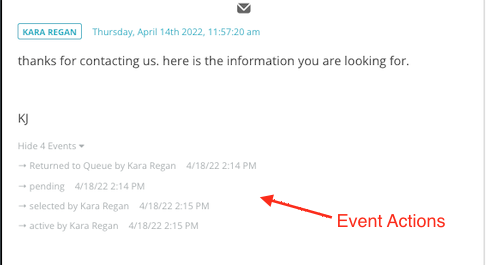
Conversation Events - These are system generated action logs that show what actions have taken place on this conversation since it was started.
For example, if a user has transferred you an email, the event log will show who originally picked it up, who transferred it and when, to whom it was transferred.
Typing a Message

At the simplest level, the "type a message" box at the bottom of the conversation area is where you will type in your reply message and tap enter or click the send icon to submit your message into the conversation. Once you do this, it will appear in your conversation under the client's message with your user name and a timestamp.
You will see some additional action icons in the message box, though some are based on permission and will not display if you don't have have permission to use them.
We will discuss three of them here:
The Square Icon - When clicked, this will open a larger "type a message" box on your screen to give you more room to construct your message. If you close the box, your message content will display in the smaller "type a message" area. Or you can send your message directly from the larger box by clicking the "send" button at the bottom of the box.
The Smiley Face - This allows you to send emoji's into your message. We recommend you talk to your organization leadership if you have a questions about if/when to use emoji's.
The Text Alignment Icon - This can be used if you are typing a message in a language that uses the opposite alignment from what what your Echo system is set. (Example: English to Arabic).
If you have additional icons that are not described here, please ask your Echo Administrator for instruction, if needed.
Review Conversation Summary Report
Every closed conversation requires an Echo User to fill out a Review Conversation Summary Report before it is consider fully closed. A closed conversation will remain in the Echo user's active conversations list until this report is submitted.
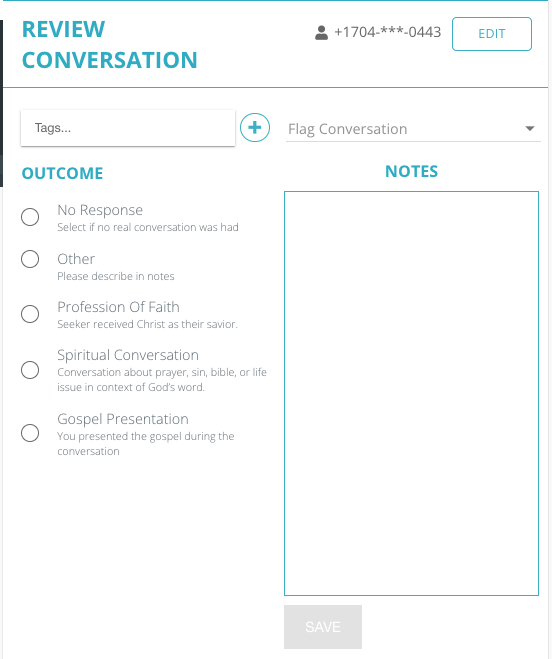
The only required item on the report is an Outcome. Outcomes are set up by your organization when they begin using Echo. Your Echo Administrator can answer question about how your organization uses Outcomes.
*In most cases, the outcome reflects the primary outcome of the conversation.
Once you select an Outcome radio button, the SAVE button will activate and allow you to submit your report. Consider if you need to add any of the below before you submit your report.
Tags - If you didn't add any tags to your conversation while it was ongoing, you have another chance to add tags from the Review Conversation Summary report. Click into the Tags field to start typing a word, or click on the + to see a full list of your organization's root tag words.
Flags - There are pre-determined flags in Echo for certain situations. Primarily situations that require you to notify your organization leadership; such as the client is in crisis, suicidal, or has confessed to a crime. There are also flags for conversations you want reviewed or needs follow up. You can also add a flag to a conversation that you want to report as a story or testimonial to your organization.
Notes - Notes is an open area for you to share something about the conversation, explain an outcome selection, or describe why you might be flagging a conversation.
When you have finished filling out the areas of the report necessary, click on the SAVE button to submit the conversation and the report. At this time, the conversation will disappear from your active conversations menu.
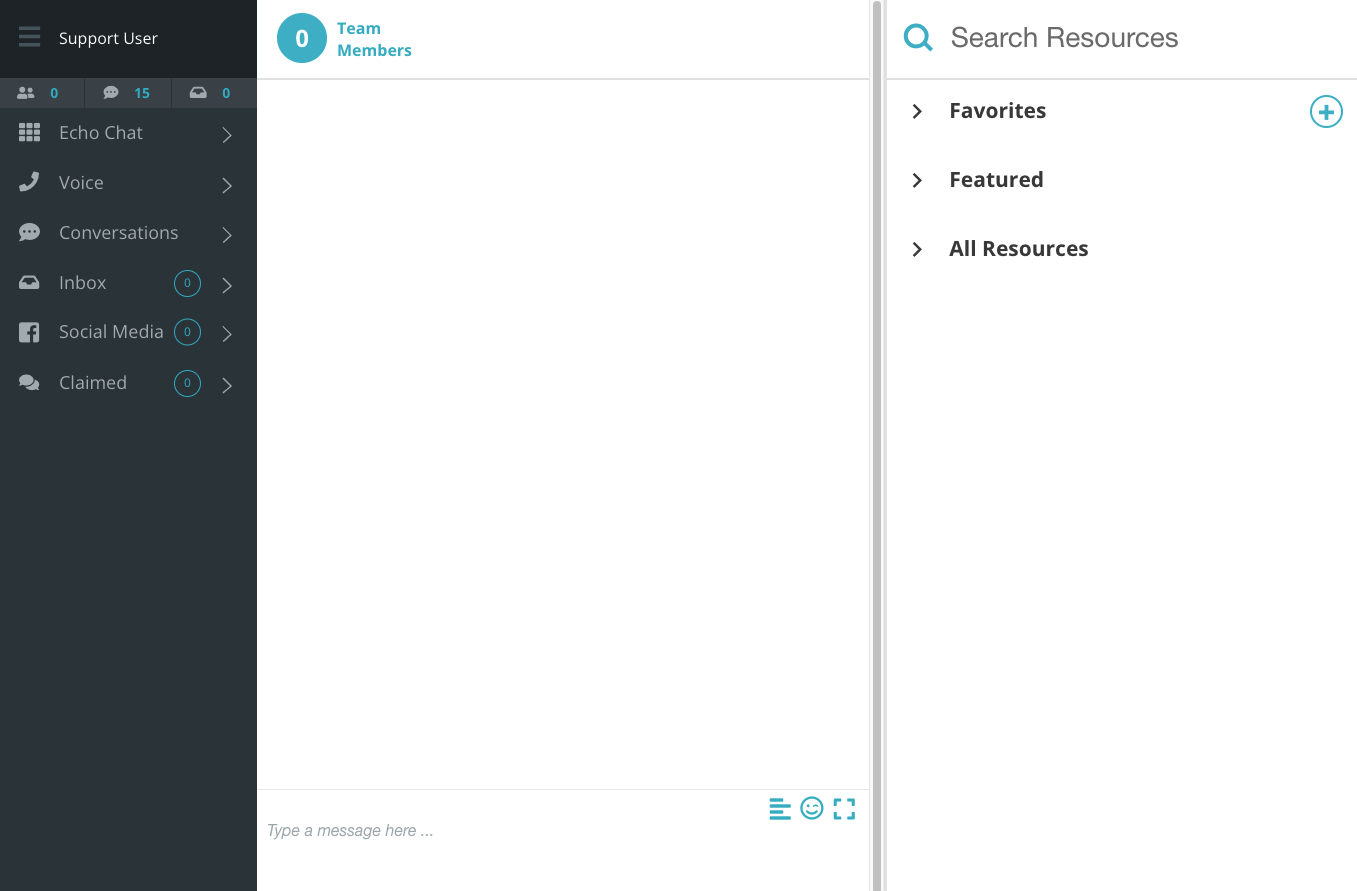
The Resources Bar
The resources bar may include instructions, topical information, links to helpful websites, Bible verses, or sample messages to assist you in responding to conversations.
In general, your Echo Administrator will determine the resources available to you in your system. You can also add your own favorite introduction or list of Bible verses, etc. to your resources area to be used/seen by only you.
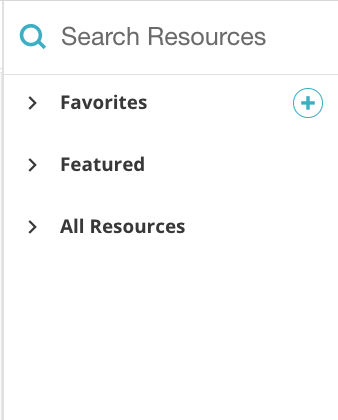
Looking for an Existing Resource
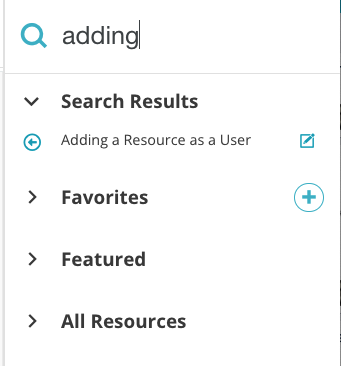
Search Resources - Particularly if your system has a lot of resources, searching for the one you want can be the most efficient way to find what you are looking for. Start typing a keyword into the search box and any results with that keyword in the title or content body will appear just below your search (above the favorites list).
Favorites - Have a few resources you use all the time? Add them to your favorites list by clicking on the star next to the resource title. (Remove from favorite list also by clicking the star).
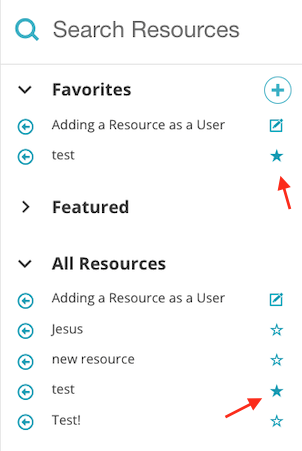
Featured - Your Echo Administrator has the option to make one or more resources "featured" resources when he/she creates the resource. Any resources marked "featured" will display under your featured list.
Any resources you add yourself to Echo will also display under you featured list.
All Resource - Per the name, all of the resources you have access to see in Echo, whether added by you or your Administrator, can be found under All Resources in alphabetical order by title.
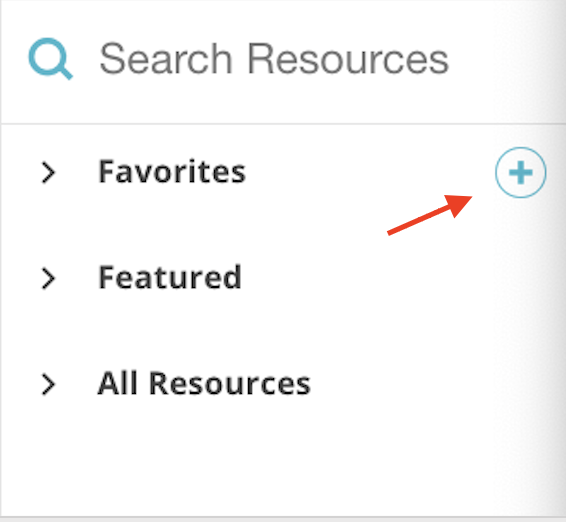
Adding a New Resource
To add a new resource, first click on the + located next to or above the "favorites" list.
This will open a box for you to fill out your resource content.
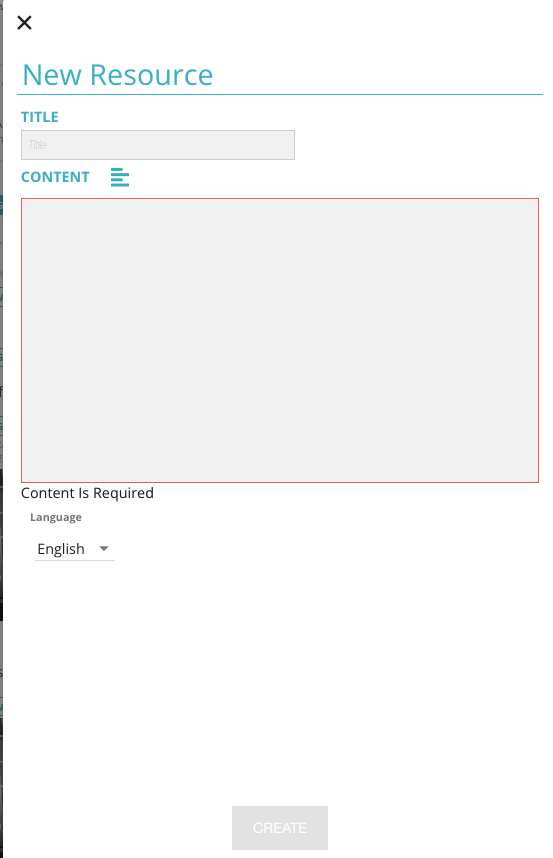
- Title - Give your resource a title
- Content Alignment - Click the alignment icon to change to text alignment from right to left, or left to right depending on the language. (Will default to proper alignment for English)
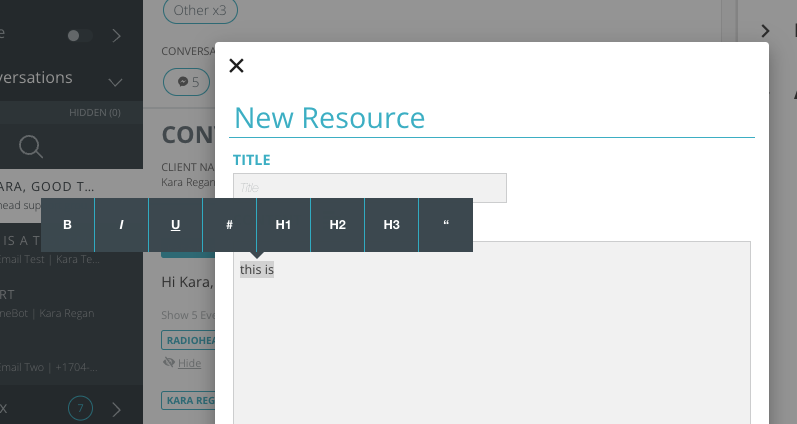
- Content - Place your resource content here. For some formatting options (bold, hyperlink, etc.), highlight your content to reveal the formatting bar.
- Language - Select the language group for which you want your resource to display. (If you use your system in Spanish, you will want to select the Spanish language. If you use your system in English, select English, etc.)
Once you have completed filling out your resource content, the CREATE button will activate and you can click it to add/save your new resource.
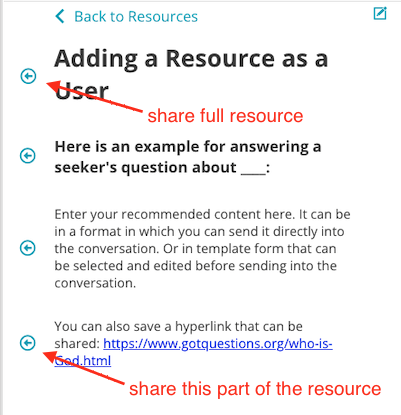
Using a Resource in a Conversation
There are three ways a resource can be added into a message
- Use the "send" arrow icon located next to the sentence or paragraph. This will bring it over to your "type a message" box where you can clean it up, edit it, and added additional text.
- Copy/Paste the content from your resource into your message response.
- If the "share full resource" permission is activated by your Echo Administrator, you will see a "send" arrow icon next to the resource title. Using this will give you the ability to send all of the contents of the resource into your message reply (rather than just one paragraph at a time).